First published in Season 4. Return to the Build Hub.
Fiiona's Baby Broccoli Healer DPS
This build is designed for leveling and the Void Gauntlet is just as important as the Life Staff. In fact, you could think of this as a Mage build, with some healing to keep you alive.
Build Summary
Weapons:
- Void Gauntlet
- Life Staff
Best for:
- PVE
- Levelling
Main Attributes:
- Intelligence
- Focus
This includes things that prevent damage such as blocks, stuns, roots, staggers.

This includes things that strengthen the team and mitigate damage, such as healing, buffing and debuffing.

This is pretty self-explanatory and covers raw damage output, including damage over time.

Difficulty: Easy
Weapon Ability Trees
As a leveling build, your Weapon Ability Trees are less about the final composition and more about which ability to take when.
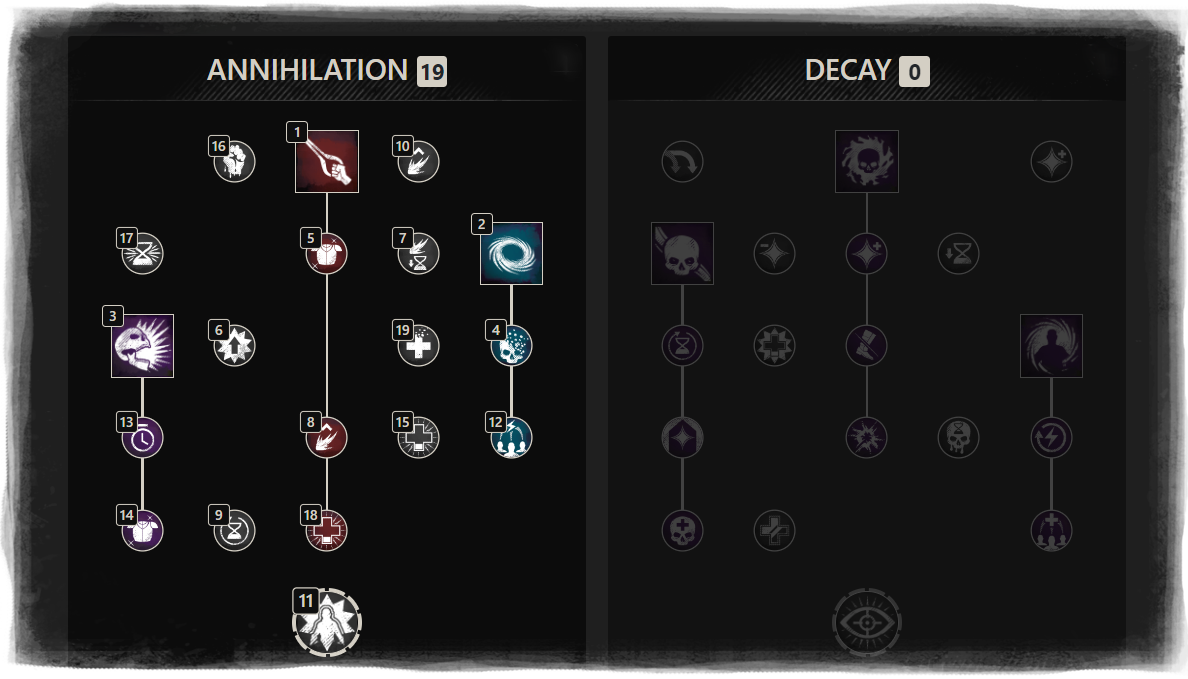
Void Gauntlet
On the Void Gauntlet, it’s best to focus on the Annihilation side and get Void Blade first up, as this is your main weapon. You can follow this up with Oblivion and then Scream, so you have your three abilities in place.
Work your way down the Void Blade and Oblivion passives, taking Withering Oblivion to apply up to 15% Weaken and Fortified Blade to gain 20% Fortify, both of which help you live longer. Empowering Proximity will help you hit harder after casting abilities. You can speed up how often this happens by taking Refreshing Precision and Refreshing Frailty for cooldown reduction. Add Keen Confidence to increase the chance to crit and Vicious Void to increase crit damage and you should have enough points invested to get Voidcaller, the ultimate ability on the Annihilation tree. This gives you a handy aura that heals you and damages your enemies for 5 seconds. Once you’ve got this far, you should have a good feel for the weapon and just fill out the rest of the tree in your own order of preference. Hover and read what the abilities do, and decide how helpful that will be for you.
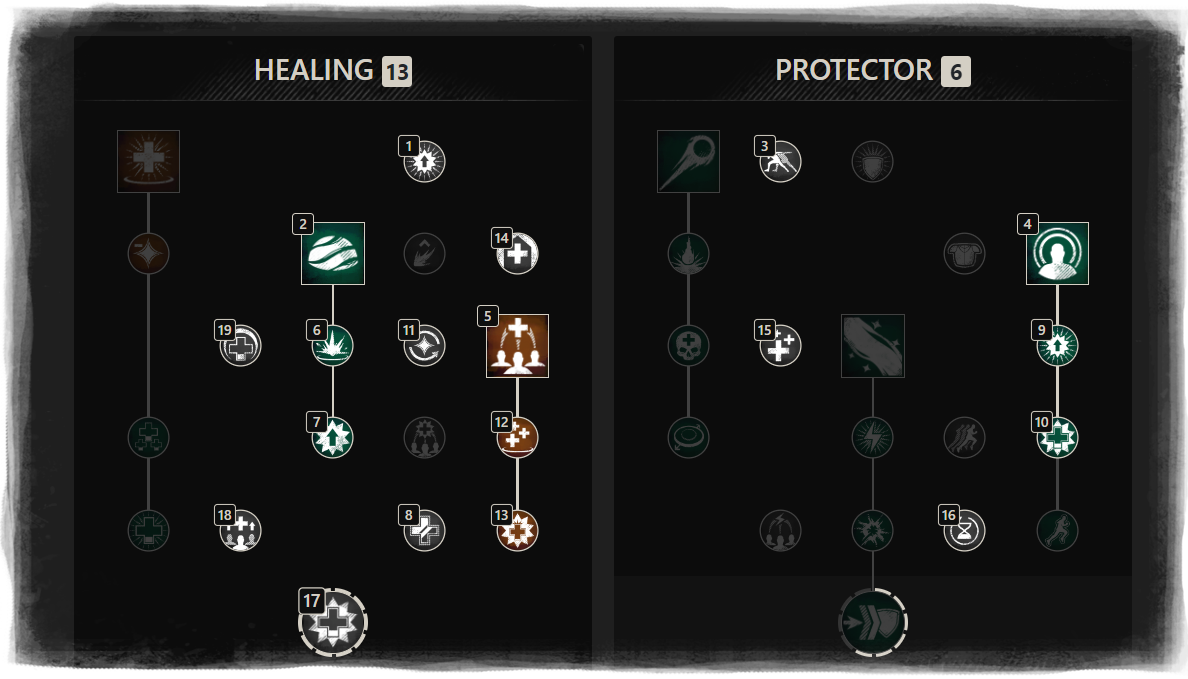
Life Staff
As leveling is mostly a solo experience, you’ll be best off with Life Staff abilities you can cast before combat. Sacred Ground and Beacon are easy choices, then it’s up to you if you prefer Orb of Protection or Splash of Light. As I’m spending more time on the Void Gauntlet and gaining Fortify there, I prefer Splash for the untargeted self-heal (and group heal if I’m playing with others), plus the debuff removal.
You should spend your first Life Staff skill point on Absolved, solely to unlock Sacred Ground for your next point. Then grab Bend Light on the Protector side, and Beacon. Next, take Splash of Light or Orb of Protection, and you have your three abilities. Continue by adding Holy Ground and Anointed on the Sacred Ground tree, for the regen and increased healing as well as enabling you to unlock Intensify. Next, take Infused Light and Radiance’s Blessing to get your Beacon to last 5 seconds longer. From here, you can add Revitalize to give you the ability to reduce cooldowns using light attacks, and add the two passives under Splash. For the rest, you can make your own choices, although it is worth getting Blissful Touch for additional heals with light attack, if you’re ever going to play this build with a group. Protector’s Strength will increase your outgoing healing by 20%, since you’ll often have a Life Staff buff, and this works well with Glowing Focus which increases the duration of your buffs by 20%
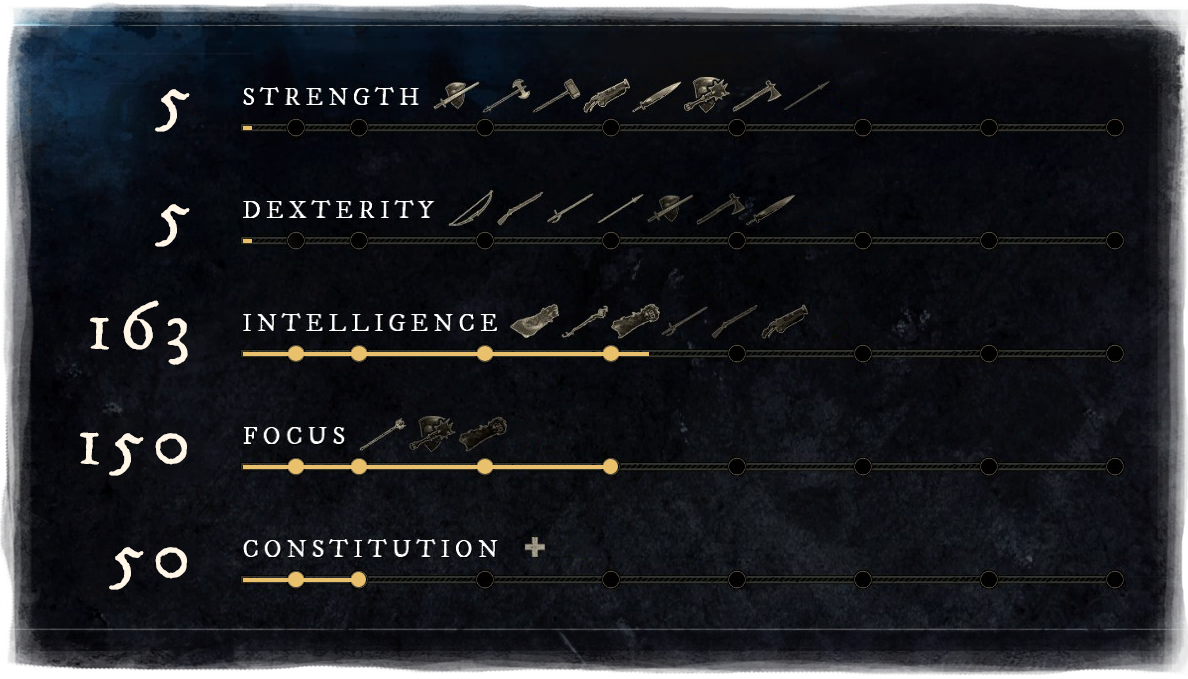
Attribute distribution
Controversially, Intelligence is your most important stat for this build, as it determines how much damage you do. Focus is still very important, as your Life Staff is useless without it and the healing from Void Gauntlet also scales solely from Focus. The final attribute you need is Constitution, although this is less important than the other two.
You should initially put points into Con, Focus, and Intelligence fairly evenly, reaching for attribute bonus bumps when they are close. Once your Con is 50, you can put more points into Intelligence and Focus. If you find your heals are not enough to keep you alive with 50 Con, you can increase it.
You can eat a Calamari and Tomato Stew for 30 extra attribute points in Int once you hit level 35.
Important perks
While leveling, you don’t really have time to focus on building sets with perfect perks, since you will outlevel your gear quickly. The main thing is to make sure you have no wasted attributes on your gear. No Dex or Str, as the attribute distribution is very tight as it is. Look for gear with Intelligence or Focus on it and use your respec to balance the points around it.
View my level 49 gearset on nw-buddy.de
Weapons
Blessed and Refreshing Move are important for this build, as it relies strongly on your abilities and healing. Damage-add perks are good for your Void Gauntlet, such as Vicious, Keenly Jagged, or Enchanted.
Armor
At level 49, you can purchase a set of Armor from the Faction vendor, assuming you have completed your faction quests and reputation up to the fourth rank. A full set will cost 750 gold and 40,000 faction tokens and will give you Health and Refreshing, both of which are useful perks. The attribute on the armour can be changed using an [Attribute] Seal, which you also purchase from the Faction Vendor, so you can change from Con to Focus or Int depending on your attribute split.
You may also find items in your loot or on the Trading Post. It’s good if you can swap a couple of the Faction items for some without Refreshing, so you don’t overcap. Good perks to look for are your weapon ability perks, especially Fortifying Sacred Ground and Nullifying Oblivion.
Jewelry
Jewelry can be hard to come by and the Faction vendor doesn’t sell any. If you’re gearing up in your 40s, the Holy Pledger’s Band you get from The Depths is good for a healer, with Focus and Sacred on it. You can pick up an amulet called Bad Blood from a side quest in the Mangled Heights area of Great Cleave. You’ll need to complete Mounting an Attack from the Main Story Quest before it appears. For an earring, you get Deckhand’s Promotion from the MSQ, or can loot Heart’s Tendril Trinket from The Depths.
My advice
In the perfect circumstances, a good way to use this build is to open by attacking a mob at distance with a heavy attack to trigger Intensify (+10% healing), dodge roll backwards to gain space and trigger Bend Light (+20% healing), throw a Beacon at the target and a Sacred Ground on yourself. Then switch to Void Gauntlet, drop Oblivion and activate Void Blade. Use Scream to reduce incoming damage and refresh the Oblivion whenever it drops. If needed, switch to the Life Staff and refresh your heals.
The default key to cast a heal on yourself is Left CTRL, which is very handy to know. You can remap it to something more comfortable if you prefer.
The way Intensify works is that it can stack up to three times, for 30% increased healing. Once the three stacks are established, it only takes 1 heavy attack every 10 seconds to maintain all three stacks. This isn’t really practical to use when soloing, but it’s good to know in case you find yourself in a situation where you can use it. It will help compensate for your relatively low focus when you’re around other people.
This build isn’t about being a healer in end-game, and your first skillset should really be DPS as it’s easier to learn the content without everyone relying on you. This is about self-survival and you should lean heavily on your Void Gauntlet to get through the battles faster. It’s not particularly high damage either, just a good balance of safety and effectiveness.
Once you reach level 65, have a look at our Regular builds and either fully spec into Healing or consider picking up another Int-based weapon for a DPS build.
Submit Your Build
If you would like to submit a build, please fill in the New World Utopian Organ Build application form to the best of your ability.