Are you as hot as Fire or as cold as Ice? Or maybe you just feel like you’re in a Void while we patiently wait for news about Season 5. In which case, Genesis might be the place to be this week. I suspect some of us might brave the cold in M3 Barnacles for some sweet weapon skins instead though.
There are three levels of Mutation, as well as Story mode, for each Expedition.
- M1 requires 650 gear score and is relatively easy, introducing the mechanics of the mutation type at a reduced level of damage.
- M2 is a little harder and requires 675 gear score, with increased scaling and the addition of the Promotion challenges. It is still quite simple to do with an experienced group and is probably the most efficient mode, with improved loot for little effort.
- M3 requires 695+ gear score and optimised perks, gems and buffs. It is considerably more challenging than M2, both with increased scaling and the addition of the mutation Curse as well as the Promotion.
Note: Elemental damage gems in your weapons are simply recommendations based on the elements your enemies are weakest to. Your playstyle may suit non-elemental gems better and you are encouraged to continue using those if so.
Expedition specific
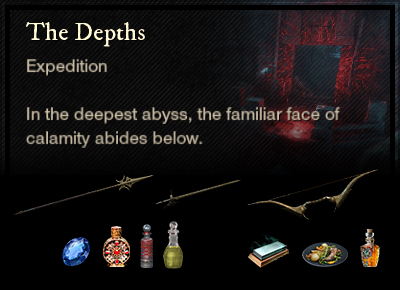
- Sapphire gem Arcane damage
- Corrupted Ward potion
- Corrupted Coating
- Thrust damage – Spear, Rapier, Bow
General buffs
- Honing Stone
- Attribute bonus food
- Topaz gypsum attunement potion
Mutation specific
- Flame protection amulet
- Rubies in armour
- Desert sunrise
Artifact: Lost Stopwatch Amulet
At mutation level, The Depths is a different place than the one you visited on your journey to level 60. There’s no time to get the hidden crate in the tree anymore, it’s all go, go, go.
The biggest challenge in this dungeon is Archdeacon Azamela in the Unholy Pit. His bombs do Void damage, so you may want to bring a Void Protection amulet to swap out for this fight and slot Void Absorption potions in your hotbar. The Archdeacon’s bombs have been buffed, so you really need to get the bubbles popped on each side as fast as you can. It’s better to send everyone at once, two on each side and the healer with the weaker team, rather than try and keep up with the bombs in the second round.
Thorpe, on the other hand, does Fire damage, so a Flame protection amulet might be good here, or even Slash protection to reduce the devastating damage done by his big sword.
Mutation: Hellfire
Burn baby burn, this rotation it’s Fire. We start with the basic Hellfire. Look at the enemies’ nameplates to see whether they are Explosive, and be sure to position yourself well away from edges when they die, to avoid being blown over. Fiery enemies apply Burn, giving you a Fire DOT, so it’s worth drinking some Desert Sunrise before you start. Ignited enemies deal 50% of their damage as Fire, so slot Rubies in your armour and wear a Flame Protection amulet to get your Fire resistance up. Enemies with Enflamed can cast a Burn zone on the ground, so watch your positioning.
At M1 level, everything is a bit easier, so you will be fine with Opals rather than Rubies, and may not need to use Ward potions or Coatings.
M2 - Barbaric
At M2, some enemies start being Barbarically buffed. Shattering is annoying for your tank, dealing 40-75% increased stamina damage! It might even be worth stacking more of the stamina perks to keep up. Watch out for those large Enraged enemies, who deal 50% more damage once they get 20 stacks of Fury.
M3 - Dessicated
The Curse of the Burning Depths is Desiccated, which is your basic dip and nae-nae. When a player gets a Fire ring around them, they need to dip all team members in order to remove their Shrivel. But make sure they nae-nae away before the timer ends to avoid spiking others with a chain Fire for 50% of their max health. If you’re unlucky enough to be left shriveled, damage and healing will be reduced by 50% until the debuff wears off.
Expedition specific
- Amber gem Nature damage
- Lost Ward potion
- Lost Coating
- Strike damage – War Hammer
General buffs
- Honing Stone
- Attribute bonus food
- Topaz gypsum attunement potion
Mutation specific
- Frozen protection amulet
- Aquamarine in armour
- Desert sunrise
Artifact: Void Darkplate Heavy Chest
Arrrrrr me hearties, let’s get Lost and Angry. Barnacles and Black Powder is mostly full of Lost enemies like pirates and ghosties, but features a couple of angry ole tentacles and a final boss having an identity crisis. The Lost are particularly weak to Nature damage, so consider putting an Amber in your weapon. Hammers and Ice Gauntlets have a slight advantage but feel free to make use of the features of your favourite weapon if you prefer. As always, attribute food and honing stones keep you at your best.
The last boss in Barney’s is so annoying, she deserves a mention of her own. While she does move to a predictable pattern, her attacks become quite frenetic and she closes in the arena dramatically, leaving very little wiggle room toward the end of the fight. Legend has it that despite looking very similar to her Lost sister the Siren Queen, Nereid is of the Angry Earth with modified Lost weaknesses. Instead of the regular 30% Nature, 15% Ice, 10% Strike, she is weak to 30% Ice and 20% Strike only. So use some Angry Earth ward and coatings, but while it might be worth swapping to an ice weapon, don’t be fooled into thinking your slash weapon would be any stronger than it already is.
Mutation: Icebound
Ice, Ice, Baby! Everything slows down in the cold and this mutation is no exception. We start with Icebound, which means all enemies are dealing Ice Damage, so pull out your Aquamarines and Frozen Protection amulet. Most annoying is Shiver, a zone of exclusion that bites anyone who is outside of it, which keeps the group huddled up together. Be careful of enemies with Glacial, as they will drop a crystal that can root you in place. To prevent this, you need to destroy or run away from the crystal, depending on where it is positioned.
At M1 level, everything is a bit easier, so you will be fine with Opals rather than Aquamarines, and may not need to use Ward potions or Coatings.
M2 - Oppressive
Once we reach M2, we start seeing Mage Hunters, who drain mana when hit, so healers need to make sure their mana potions are slotted. Suppressor enemies cast a silence zone in which no abilities can be used, but at least it doesn’t have the explosion at the end.
M3 - Fiendish
The first of our M3 curses is Weary, which slows down player movement as well as increasing damage taken by 20%. This is on a timer and while you’re meant to be able to delay it by using abilities, it’s been glitchy in game so don’t rely on that.
The other curse is Blood Offering. Using abilities causes a 4.5% Ice DoT, which can stack up to 3 times, however while under the influence of Offering players also get a 25% life leech. So as long as you’re doing damage, this curse has little effect. The main person it impacts is the healer, so they may need to focus on healing themselves. Drinking some Desert Sunrise before you start the expedition should help reduce the effect.
Expedition specific
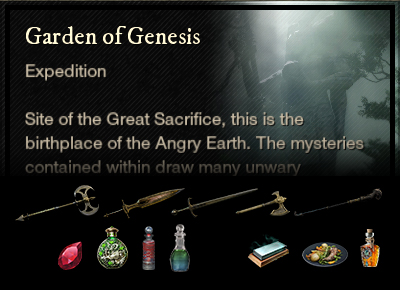
- Angry Earth Ward potion
- Angry Earth Coating
- Slash/Fire damage – Hatchet, Axe, Great/Sword, Fire Staff
- Blight Tincture
General buffs
- Honing Stone
- Attribute bonus food
- Topaz gypsum attunement potion
Mutation specific
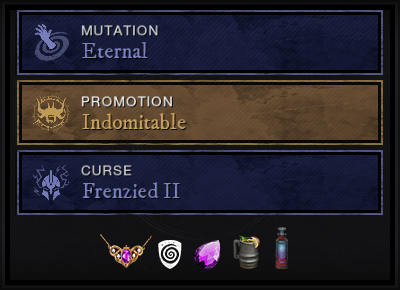
- Void protection amulet
- Amethyst in armour
- Desert sunrise (or Powerful Incense to increase resistance to Blight)
Artifact: Freya’s Francisca Hatchet
The Garden of Genesis is one of the classic expeditions, having been in the game since release and very popular as a place to raise your item expertise. It’s the only Angry Earth dungeon and can be run pretty fast, although there are a couple of sticky spots that can slow groups down. The worst of these is Alluvium Marl, the Caretaker, who guards his Greenhouse in the middle of the dungeon. He can be seen terrifying those facing him. Our advice for this boss is to just kill him, and do it fast.
Mutation: Eternal
It’s all purple in Genny this week, with the Eternal mutation transforming the enemies to Void damage, so go with the theme and protect yourself with Amethysts. Paranoia is particularly annoying, with stacks building up as you hit the enemy. When you reach 4 stacks, a purple pool appears at your feet, dealing 40-70% damage. This is easily dodged as an individual, but when the melee are crowded together, you can end up with some big spikes of pain. It might be an opportunity to try a ranged DPS team for a change, with the tank holding aggro and 3 bow users shooting from afar. Creeping enemies Empower their friends when they die and Oblivion enemies use a life leech that heals them when they hit you.
At M1 level, everything is a bit easier, so you will be fine with Opals rather than Amethysts, and may not need to use Ward potions or Coatings.
M2 - Indomitable
When we get to M2, some of the mini-bosses gain Phalanx shields that block projectiles, which is particularly annoying for healers who are trying to speed up their cooldowns or charge up their heals with heavy attacks. If you play ranged DPS, make sure you have a melee weapon in your other slot and be aware that heals might be a bit less powerful. Vampiric also makes an appearance, which can make enemies slower to kill, so your Bile Bomb heartrune might be useful.
M3 - Frenzied
The real trouble starts when things get Frenzied. At M3, players begin being penalised for dodging, by acquiring a stack of Unstable that does 1.5% of max health as Void damage per second for 10 seconds and cannot be cleansed. You can get up to three of these stacks, and when you do it drops a 3m radius zone that does 10% of max health per second for 15 seconds – ouch, that’s 150% of your health if you just stand there! If you enter this zone with stacks of Unstable, it will consume them and do 30% of max HP. So, it’s really important to manage your stacks and move away from the group if you can’t avoid dropping a puddle. Don’t poop on the group.


