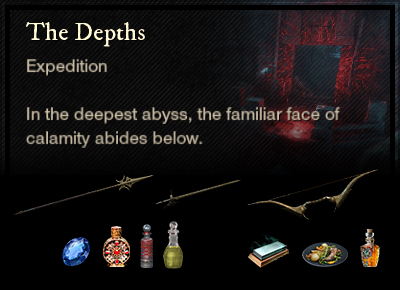
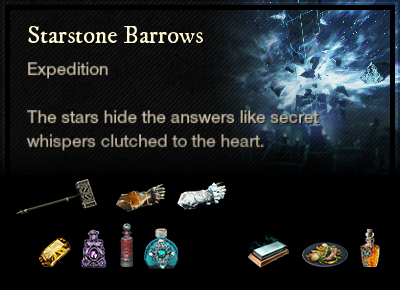
No beautiful synergy this week, although I’d say the Depths has the least annoying curse so might be the easiest M3. Laz is Fire, which doesn’t slow you down too much unless you get blown off the edge, but managing your dodges with Frenzied can take some practice. Starstone, as always, is a good one to run to help newer and returning players pick up Blooddrinker for their solo build.
No bug fix patch either, and Delos misses out again on the Week 3 Community Convergence Photo Comp – I would have loved to enter that one. If anyone has a Valhalla character, pop over and visit JakeL for the runway show on June 1, 6PM ET to 7PM ET, or join in the Twitch streamer events.
There are three levels of Mutation, as well as Story mode, for each Expedition.
- M1 requires 650 gear score and is relatively easy, introducing the mechanics of the mutation type at a reduced level of damage.
- M2 is a little harder and requires 675 gear score, with increased scaling and the addition of the Promotion challenges. It is still quite simple to do with an experienced group and is probably the most efficient mode, with improved loot for little effort.
- M3 requires 695+ gear score and optimised perks, gems and buffs. It is considerably more challenging than M2, both with increased scaling and the addition of the mutation Curse as well as the Promotion.
Note: Elemental damage gems in your weapons are simply recommendations based on the elements your enemies are weakest to. Your playstyle may suit non-elemental gems better and you are encouraged to continue using those if so.
Expedition specific
- Sapphire gem Arcane damage
- Corrupted Ward potion
- Corrupted Coating
- Thrust damage – Spear, Rapier, Bow
General buffs
- Honing Stone
- Attribute bonus food
- Topaz gypsum attunement potion
Mutation specific
- Nature protection amulet
- Amber in armour
- Desert sunrise
Artifact: Lost Stopwatch Amulet
At mutation level, The Depths is a different place than the one you visited on your journey to level 60. There’s no time to get the hidden crate in the tree anymore, it’s all go, go, go.
The biggest challenge in this dungeon is Archdeacon Azamela in the Unholy Pit. His bombs do Void damage, so you may want to bring a Void Protection amulet to swap out for this fight and slot Void Absorption potions in your hotbar. The Archdeacon’s bombs have been buffed, so you really need to get the bubbles popped on each side as fast as you can. It’s better to send everyone at once, two on each side and the healer with the weaker team, rather than try and keep up with the bombs in the second round.
Thorpe, on the other hand, does Fire damage, so a Flame protection amulet might be good here, or even Slash protection to reduce the devastating damage done by his big sword.
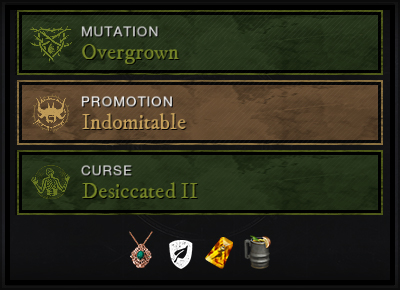
Mutation: Overgrown
Overgrown means those mobs are going to be healing one another, which really should be a privilege exclusive to us. Compost mobs drop a healing circle that works like a Sacred Ground for them and looks a bit like one too. This is one of the rare times that disease perks are useful in PVE, so pull out your Hatchet with Infected Throw, or slot a weapon with Plagued Strikes or Plagued Crits. Your Bile Bomb heartrune will also spread disease around, so vomit away to your heart’s content.
Toxic mobs spawn THE most annoyingly friendly little green blob that follows you around, does damage over time that increases at the higher mutations, and casts an area root. We just love not being able to move and getting damaged at the same time! Best bet is to try and stay out of its way. If you get stuck, it might be worth it to have Nature Absorption potions slotted and chug one down. Arboreal enemies are dealing 50% of damage as Nature, and Bramble enemies deal 20-40% base damage as Nature, so Amber slotted in your gear will protect you.
At M1 level, everything is a bit easier, so you will be fine with Opals rather than Ambers, and may not need to use Ward potions or Coatings.
M2 - Indomitable
When we get to M2, some of the mini-bosses gain Phalanx shields that block projectiles, which is particularly annoying for healers who are trying to speed up their cooldowns or charge up their heals with heavy attacks. If you play ranged DPS, make sure you have a melee weapon in your other slot and be aware that heals might be a bit less powerful. Vampiric also makes an appearance, which can make enemies slower to kill, so your Bile Bomb heartrune might be useful.
M3 - Dessicated
The Curse of the Overgrown Depths is Desiccated, which is your basic dip and nae-nae. When a player gets a Nature ring around them, they need to dip all team members in order to remove their Shrivel. But make sure they nae-nae away before the timer ends to avoid spiking others with a chain Nature for 50% of their max health. If you’re unlucky enough to be left shrivelled, damage and healing will be reduced by 50% until the debuff wears off.

General buffs
- Honing Stone
- Attribute bonus food
- Topaz gypsum attunement potion
Mutation specific
- Void protection amulet
- Amethyst in armour
- Desert sunrise
Artifact: Blooddrinker Ring
The Starstone Barrows is an exotic mashup of our first dungeon experiences, with the expedition taking adventurers through both Starstone and Amrine. We start in Starstone and then instead of ascending the stairs to the central pillar, a breakage appears to our left and we sneak into Amrine to face Simon Grey. Then we work backwards through Amrine until we return to Starstone on the other side of the central pillar. This means we get a fun split of Ancient and Lost enemies, and need to carry double the potions.
Just like at the end of Amrine, Simon is a heavy hitter with a periodic minion spawn, but now he’s completely buffed. If you don’t manage to dodge his smash-down attack, there’s a good chance of light-armoured players being wiped. On top of that, if you can’t kill his minions, he eats them up for a little heal, prolonging the fight.
Time is tight in this dungeon and there are a few tough fights where the mobs are grouped up or skipped. Keep those Ward potions handy and make sure you have a good healer.
The final boss, Greundgul the Regent, whose voice taunts us all the way through, has a fairly predictable mechanic and isn’t too bad as far as dungeon bosses go. The most important thing here is that everyone sticks together, literally stacking on one another during the jumping phase to help co-ordinate the dodges. Also during the bone throwing phase, it’s good to keep those bones close and take advantage of our AOE damage. If you can get a ranged attack on her face when she lands her jump, it makes everything easier as it stuns her and stops her jumping phase early.
Mutation: Eternal
It’s all purple in Starstone this week, with the Eternal mutation transforming the enemies to Void damage, so go with the theme and protect yourself with Amethysts. Paranoia is particularly annoying, with stacks building up as you hit the enemy. When you reach 4 stacks, a purple pool appears at your feet, dealing 40-70% damage. This is easily dodged as an individual, but when the melee are crowded together, you can end up with some big spikes of pain. It might be an opportunity to try a ranged DPS team for a change, with the tank holding aggro and 3 bow users shooting from afar. Creeping enemies Empower their friends when they die and Oblivion enemies use a life leech that heals them when they hit you.
At M1 level, everything is a bit easier, so you will be fine with Opals rather than Amethysts, and may not need to use Ward potions or Coatings.
M2 - Oppressive
Once we reach M2, we start seeing Mage Hunters, who drain mana when hit, so healers need to make sure their mana potions are slotted. Suppressor enemies cast a silence zone in which no abilities can be used, but at least it doesn’t have the explosion at the end.
M3 - Censored
In M3, players are Censored with silence. Using abilities causes a meter to build up and when it is full, silence is cast on each member of the group where they are standing. Abilities cannot be used inside the silence zone and when it expires, it detonates with a massive 65% max health damage. So it’s pretty important to keep an eye on the meter and make sure that silence zones are strategically placed. You can deliberately set off Silence before big fights, and in boss battle arenas you can clump to stack the Silence and reduce the area impacted. While silence is active, natural mana regen is turned off, however you can get 25 mana per 0.75 seconds by standing in the silence. Just don’t be in there when it explodes!

Expedition specific
- Topaz gem Lightning damage
- Ancient Ward potion
- Ancient Coating
- Strike damage – War Hammer
General buffs
- Honing Stone
- Attribute bonus food
- Topaz gypsum attunement potion
Mutation specific
- Flame protection amulet
- Rubies in armour
- Desert sunrise
Artifact: Spark of Mjölnir War Hammer
It’s The Lazurus Instrumentality week, everyone’s favorite place to be. As always, Ancient enemies require ancient solutions and this means Hammers! Crush those bones down, but don’t forget the utility of your secondary weapons. Every good mutation team benefits from a Spear with Perforate and a Great Axe with Grav Well to keep things running smoothly. Or any other way you can think of to weaken those enemies and buff up your friends.
You might want to consider Topaz for your weapons, as it converts some of your damage to Lightning, which is strong against Ancients, or you might choose to slot an Emerald for those large numbers in Chardis’ final down phase. Add an Ancient Coating, Infused if you can afford it, and a Honing stone to maximise damage. Chug down an Ancient Ward potion before getting started for some extra protection. Remember to eat an attribute food of your choice and take your Topaz if you need to collect some gypsum.
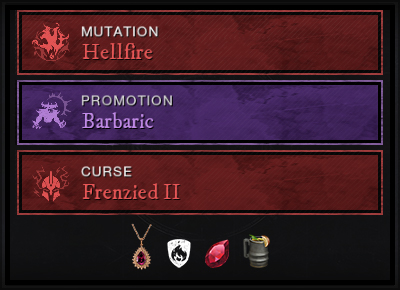
Mutation: Hellfire
Burn baby burn, this rotation it’s Fire. We start with the basic Hellfire. Look at the enemies’ nameplates to see whether they are Explosive, and be sure to position yourself well away from edges when they die, to avoid being blown over. Fiery enemies apply Burn, giving you a Fire DOT, so it’s worth drinking some Desert Sunrise before you start. Ignited enemies deal 50% of their damage as Fire, so slot Rubies in your armour and wear a Flame Protection amulet to get your Fire resistance up. Enemies with Enflamed can cast a Burn zone on the ground, so watch your positioning.
At M1 level, everything is a bit easier, so you will be fine with Opals rather than Rubies, and may not need to use Ward potions or Coatings.
M2 - Barbaric
At M2, some enemies start being Barbarically buffed. Shattering is annoying for your tank, dealing 40-75% increased stamina damage! It might even be worth stacking more of the stamina perks to keep up. Watch out for those large Enraged enemies, who deal 50% more damage once they get 20 stacks of Fury.
M3 - Frenzied
The real trouble starts when things get Frenzied. At M3, players begin being penalised for dodging, by acquiring a stack of Unstable that does 1.5% of max health as Fire damage per second for 10 seconds and cannot be cleansed. You can get up to three of these stacks, and when you do it drops a 3m radius zone that does 10% of max health per second for 15 seconds – ouch, that’s 150% of your health if you just stand there! If you enter this zone with stacks of Unstable, it will consume them and do 30% of max HP. So, it’s really important to manage your stacks and move away from the group if you can’t avoid dropping a puddle. Don’t poop on the group.