From Chromatic Seals to PVP Track Artifacts, there are lots of benefits to participating in the PVP side of New World. This can seem unfair to PVE players, who don’t enjoy engaging in PVP combat. This guide is here to show you that you can gain the benefits of PVP bonuses without needing to “get gud” at killing other players. All you need to do is gain PVP XP or reputation and you don’t need to see another player to achieve either.
Contents
Factions in New World
To interact with any of the PVP systems in New World, you’ll need to join a Faction. There are three factions to choose from:
- Covenant – Gold – Righteous and Religious
- Marauders – Green – Brave and Brawny
- Syndicate – Purple – Smart and Sneaky
(my interpretations)
There are some small benefits to being in the dominant faction on your server, but this will likely change over time so it’s not that helpful to use it as the basis for your decision. Just pick the one you like or that your friends are in.
It’s important to note that while you can join a Company without a faction, every Company has the faction of its Governor and you cannot join the company if you belong to a different faction.
Joining a Faction
To join a Faction, you’ll need to complete the initiation quests. These pop up on the map in Everfall at around level 17. Look for quest markers in each of the faction colours.
To gain access to the high level shop items, you’ll need to increase your Faction Rank.
You do this in two ways – firstly you need to increase your reputation by completing Faction Missions, then you need to complete a quest for each rank level.
You can get more Reputation per mission in a zone by choosing this on your Standing cards, so consider making one area your faction town. PVE Faction missions include visiting regular or elite locations to loot items or kill enemies, killing a certain type of animal, or killing/looting in an expedition. Expedition missions give the best rewards, so it’s worth picking these up when you’re in town and completing them when you do the expedition.
Chromatic Seals are pretty much essential for end-game, as you need them to finish your Artifacts, and to upgrade Named Items. They are available in the final rank of the faction shop, and are Bind on Pickup, so there is no option to trade them.
Other Faction Shop items
If you’re a crafter, you’ll want to have access to Azoth Inductors, for making 700GS gear without any RNG involved. These are Bind on Pickup at the final rank of the faction shop. You can also get things like Gypsum Orbs, Runes for making bags and storage chests (these are tradeable), Armour, Weapons, and Skins, Gathering XP crates, Material Convertors, Gem setting Pins for adding gem slots to Artifacts, and more.
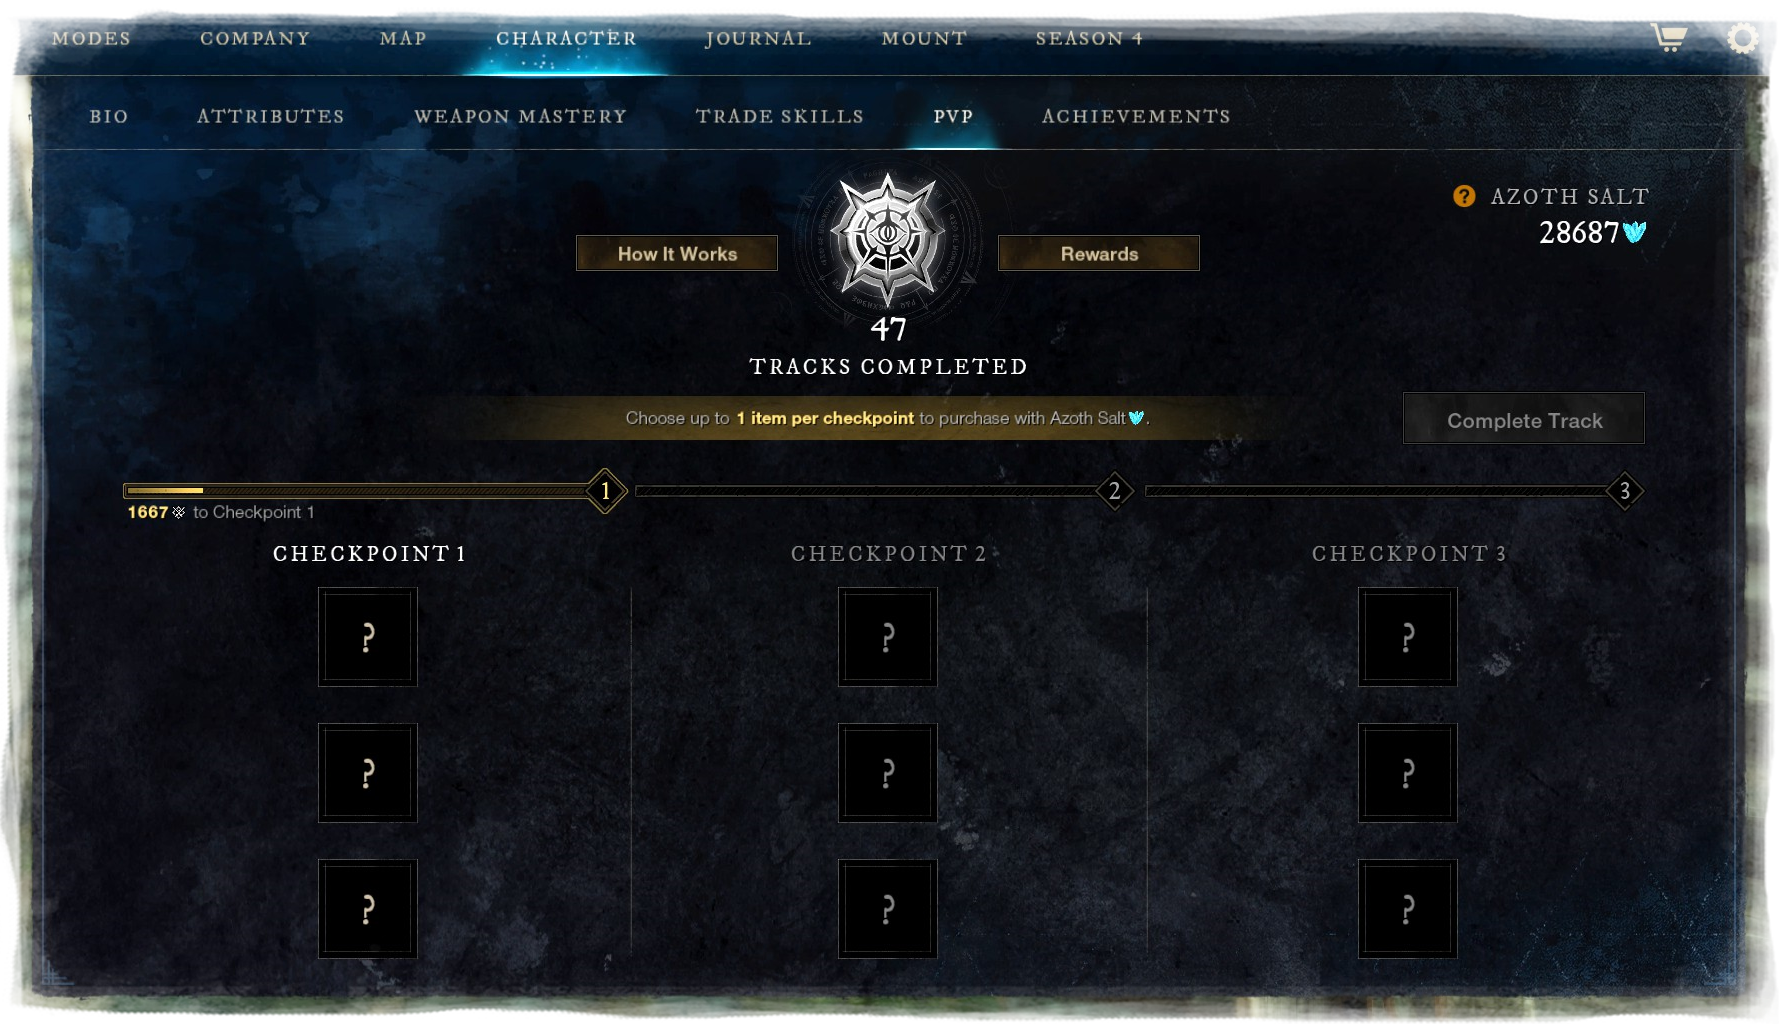
The PVP Track
If you press K for Character and go to the PVP tab, you’ll see a track progress page. As you gain PVP XP, your track will fill up. At each Checkpoint, you’re given the option of 3 rewards. These include weapons and armor, some Named, some random; PVP specific craft mods and potions; coin; tokens; gypsum orbs; emotes; and Artifacts. It costs Azoth Salt to buy a reward, or you can choose to skip the checkpoint without buying any.
Earning Azoth Salt
You get Azoth Salt for participating in PVP activities like killing players or completing Outpost Rush. However, if you don’t want to PVP, you can also gain Salt just by doing PVE while PVP-flagged. Press U while in town or at a Fast Travel Shrine to flag. Every 10k player XP you earn, you will receive Azoth Salt.
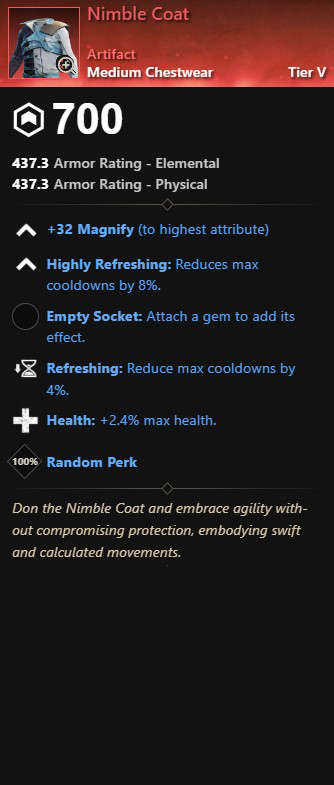
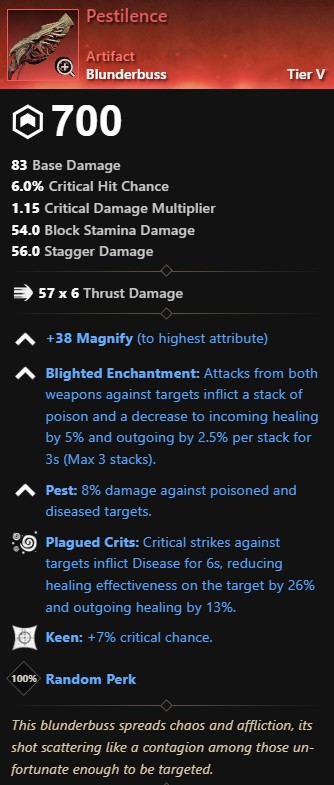
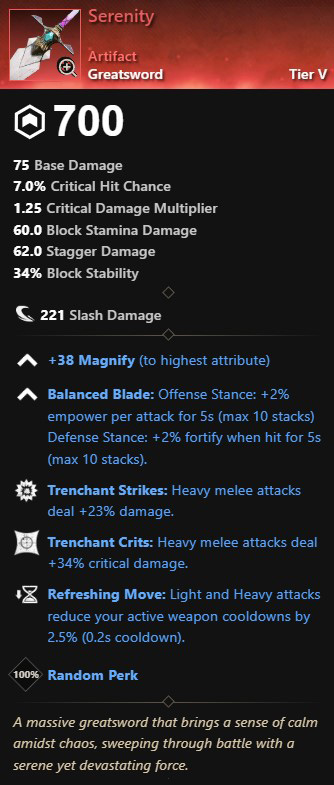
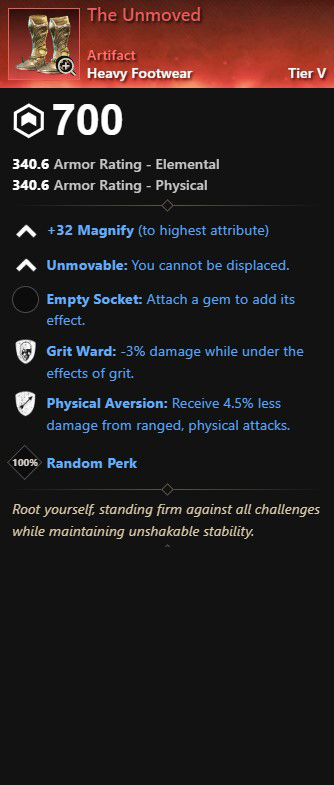
The main reason PVE players want to progress the PVP Track is to receive Artifacts. These only appear on Checkpoint 3 at levels 29, 39, 59, 69, 79, 89, 100-103, 105-113, 115-123, 125-133, 135-143, 145-153, 155-163, 165-173, 175-183, 185-193, 195+. It is random whether you will get one or not, and they cost 50,000 Salt to buy when one does turn up.
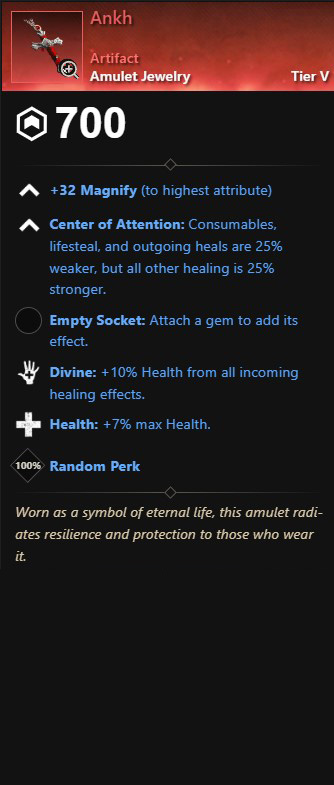
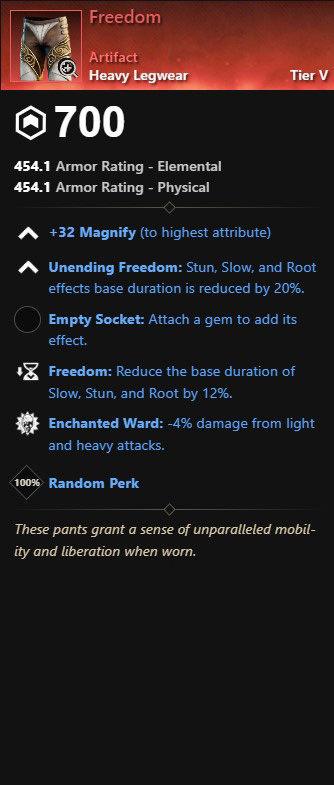
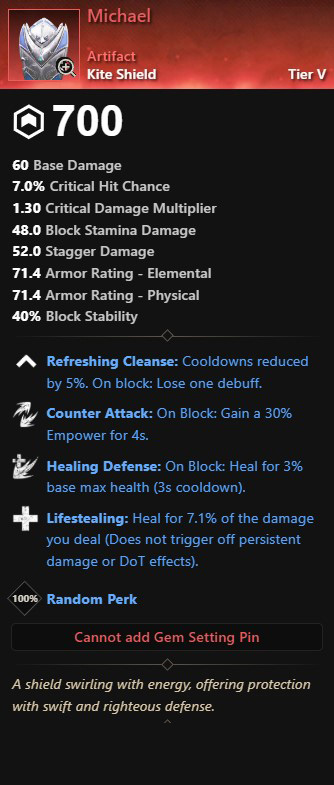
There are currently nine Artifacts on the PVP Track and it is likely more will be added in the future. They are:
- Ankh amulet
- Freedom heavy legwear
- Michael kite shield
- Nimble Coat medium chestwear
- Pestilence blunderbuss
- Serenity greatsword
- The Unmoved heavy footwear
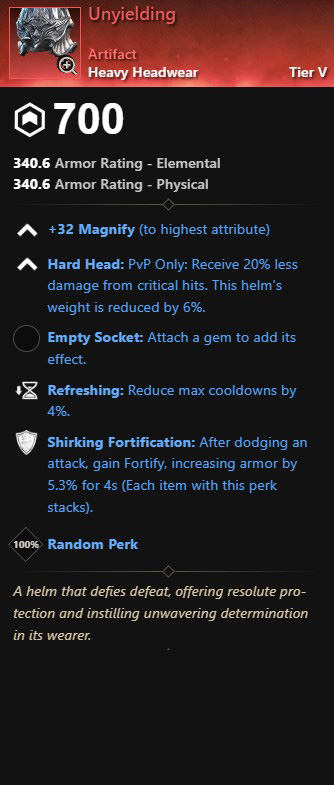
- Unyielding heavy headwear
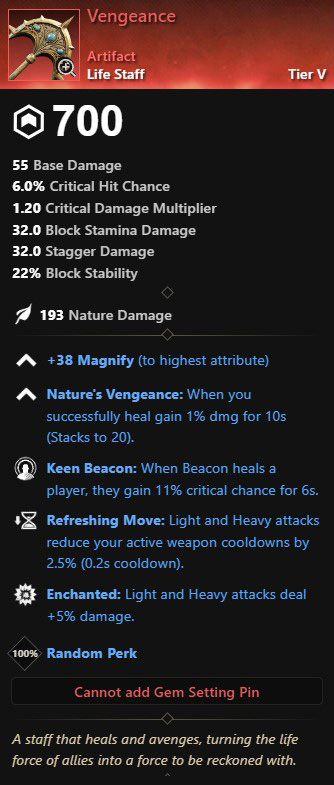
- Vengeance lifestaff
- Ironheart heavy legwear

Daily Races
Every evening, there will be Races for territory ownership. They last for 45 minutes and involve capturing points in that territory.
If you run one PVP mission during the 45 minutes, you’ll be rewarded with 1000 PVP XP, 5240 Faction tokens, 500 Azoth salt, 100 gold, standing, a Ruby Gypsum, and a Sovereign Influence Cache – plus the rewards from the mission itself.
Not bad for 5 minutes work!
Just make sure you don’t load into an instance between handing the mission in and the Race ending.

Run PVP missions
When you interact with your Faction Representative, you will see 6 mission tiles for the local region. The top three are PVE missions, while the bottom three are PVP missions. You can only complete a PVP mission while flagged, and if you die or fast travel while you have a mission active, it will reset any progress. So you need to complete these missions mounted or on foot.
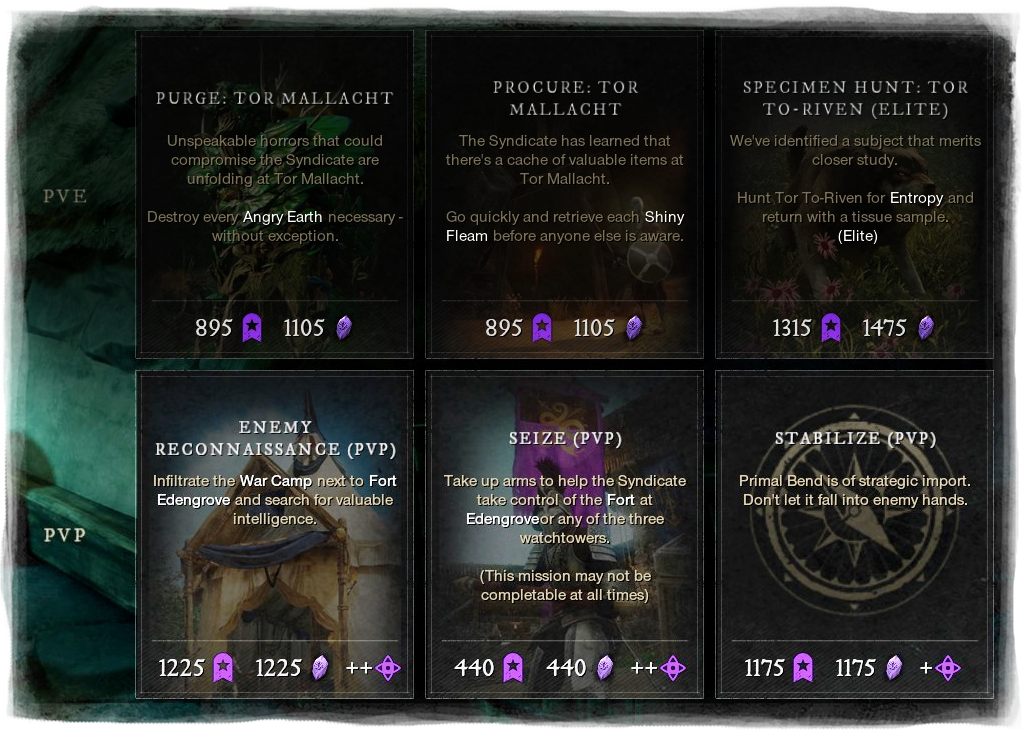
All PVP missions from the Faction Representatives give 350 PVP XP, even those from low-level territories like Windsward. So the key is to find missions that you can complete quickly. The missions generally fall into four categories:
- Stabilize – this means stay in the specified area for 1.5 minutes
- Gather Intel – you will need to go to a location, pick up some intel and deliver it to another location
- Enemy Reconnaissance – this involves looting chests at a point of interest, like a War Camp
- Seize – this means you need to take the local Fort by standing on the control point for 5+ minutes. You can only do this mission if the fort is unlocked and held by another faction.
Great Cleave PVP Faction missions
Great Cleave is the best place to run PVP missions, as long as there are not members of the enemy factions around waiting to kill you. You can reliably complete 3 missions in 5 mins, earning 1050 PVP XP.
Note: The below issue has been fixed in Season 5, but I’ll just leave the video and explanation here for history’s sake.
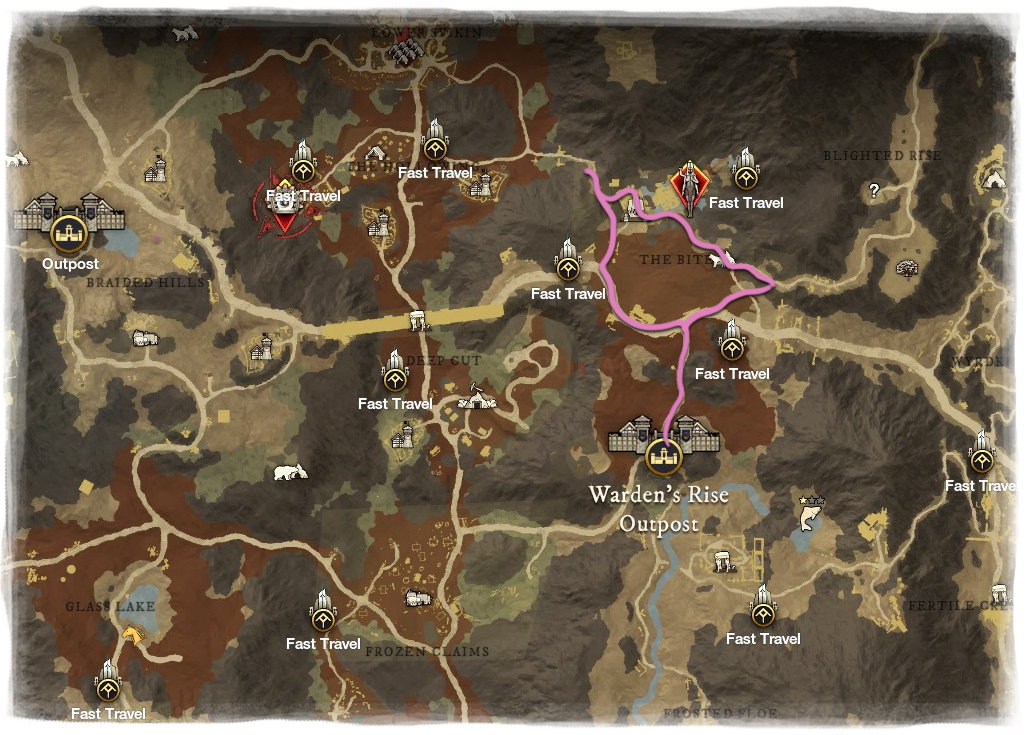
When you first approach the Faction Rep in Warden’s Rise, only 2 PVP missions will appear. You need to take those two and wait out the 5 -minute timer, either by running the missions or waiting in town. Once the timer gets to 0, re-interact with the Faction Rep and you will see a third mission. Each time you return to hand in missions, make sure the timer is just below 5 minutes, rather than close to 0. See the video below for a visual explanation of how this works.
You pick up the Great Cleave PVP missions from Warden’s Rise Outpost. Mokosh Springs is the Ancient ruin outside the Glacial Tarn expedition and that is where your Enemy Reconnaissance chests are located. There are many more than 5 chests there, so you can choose your own route. The Gather Intel boxes are on either side of the Springs and both areas, as well as the land between Mokosh and the road, are in The Bite, which is the region you need to Stabilize. You’ll generally stay long enough in the Bite without needed to stand around.
Unlocking PVP Artifact perks
Once you get the Artifact from the track, the hard work isn’t over. You still need to unlock the perks to make the item useful. All PVP Track items have the same tasks for unlocking the perks, and sadly, this means killing players. Make sure you are wearing the artifact while you complete the objectives, or it doesn’t count.
Defeat 20 Player enemies in Outpost Rush
The important thing to know here is that you don’t need to kill each enemy on your own. Outpost Rush is a 20×20 PVP mode, so there are plenty of other people on your team to help with the killing. I recommend wearing heavy armour and using a weapon with some Area of Effect damage on it. The armour will keep you alive for longer, and AOE means you have a greater chance of contributing to a kill. I like to use a bow with Explosive Arrow, Rain of Arrows, and Poison Shot. A magical weapon like Fire Staff or Ice Gauntlet would also work well. You ‘ll want at least 150 Con as well, if not more.
Defeat 20 Player enemies in Arena
This one can seem tricky if people are not queuing for Arenas on your server. Your best chance here is to call upon 5 friends who also need to unlock PVP Artifacts and queue in two 3-player groups. If you don’t have any friends who play, you can ask in Recruitment chat.
Defeat 35 Player enemies
Even though it isn’t specified, this means Open World kills, so the ones you get in OPR and Arena won’t count. The best way to get this is to join in on an Influence Race. Again, beef yourself up a bit with Con and Armor. Kills by your group will be credited, so make sure you check Faction Chat and join the Raid.
Good Luck
As you can see, there is a little bit of player killing to finally unlock the Artifacts, but for the most part you can treat this like any PVE part of the game. Even if you don’t like PVP, it is worth joining a Faction and receiving all the benefits. Who knows, you might end up with a taste for it after all!