This week's mutation is hazardous Hellfire
More like a duplication than a rotation this week. Hope everyone’s happy with Starstone and the Depths! No particular synergy this week, and I can’t even try to sell the silver lining of being able to get Blooddrinker to use in the Spriggan event, because that’s over.
Contents
Mutation

- Ignited – 50% of all enemy damage is Fire.
- Fiery – Burn is applied on hit – M1: 4% Fire damage over time, M2 & M3: 8% Fire damage over time.
- Enflamed – Enemies with this title cast a Burn zone that deals Fire damage over time. M1: 20%, M2 & M3: 40%.
- Explosive – Enemies with this title explode on death, dealing 70% Fire damage.
Promotion

- Enraged – Each hit on an enemy generates a stack of Fury. At 20 stacks, the enemy grows 15% larger and does 50% increased damage.
- Shattering – Enemies deal additional stamina damage and apply a bleed on breaking your block. M1: 20% increased stamina damage, 5% bleed, M2 & M3: 75% increased stamina damage, 8% bleed.
Curse

- Unstable – After dodging, players receive a stack of Fire damage over time dealing 1.5% max health every second for 10 seconds.
- Overcharged – If Unstable expires with 3 active stacks, it drops a 3m zone that lasts 15 seconds and applies 10% max health Fire damage per second. Entering the zone will consume all stacks of Unstable and deal 30% max HP damage.
Consumables
- Flame Protection Amulet
- Rubies in Armor/Jewelry
- Desert Sunrise
- Fire Absorption Potion
- Honing Stone
- Attribute bonus food
Gearing up
- M1 – Opals in your armor is fine
- M2 – Add the Flame Protection Amulet
- M3 – Swap most of your Opals for Rubies
- Enchanted Ward – Aim for 4 or 5 pieces with this perk
- For more detailed advice on gear, check out our Gear Guide.
Dodge Explosions
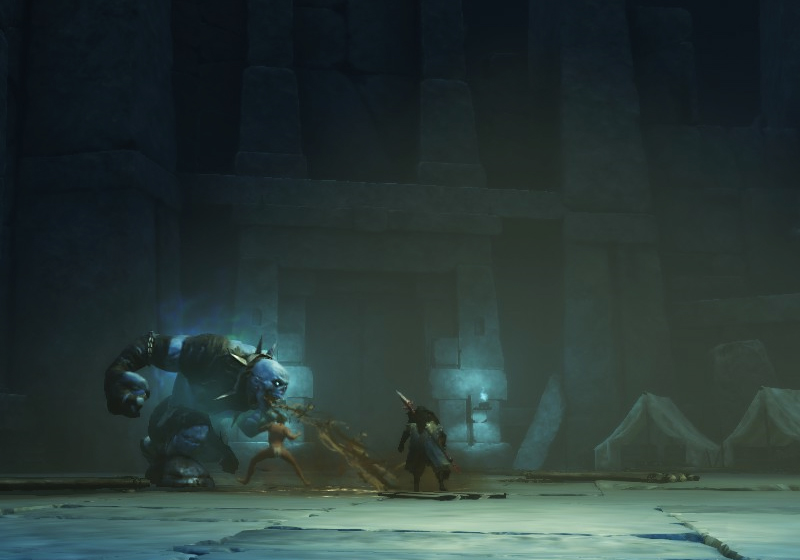
Explosive enemies go boom! Not only does this do a big chunk of damage but it also throws you around, even off the edge of the dungeon, if you’re close. Look for the title and be ready to dodge or get out of the way.
The floor is lava
The Burn zone from Enflamed enemies can get pretty hot, so make sure you’re stacking on, and staying in, the heals. Leaving and returning to this space may cause an (unintended?) double stack of burn, so either stay with the clump or stay out of the fire.
M2 - The best defense is a good offense
It’s best to get in first and kill these guys fast. After being hit 20 times, Enraged enemies are going to get bigger and stronger. Your tank will also need to draw on more skills than right-click, with Shattering enemies around. A side-step can help avoid a hit without using precious stamina, if you have the footwork skills for it.
M3 - Don't Poop on the Group
While fully geared and optimised groups can power through multiple Overcharged pools of pain, civilised dodgers might prefer to drop their load in a corner away from others. The other option is to use your dodges carefully and never allow the full three stacks to build up.
Starstone Barrows
Enemy Type: Ancient and Lost
Weaknesses: Ancient: 30% Lightning 20% Strike 15% Void. Lost: 30% Nature 15% Ice 10% Strike
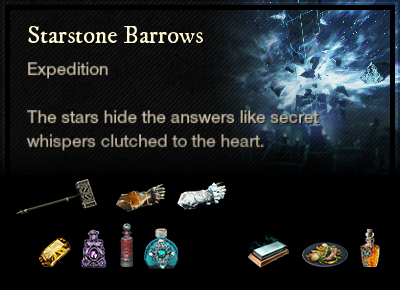
Consumables
- Ancient Ward potion | Lost Ward potion – 10% damage absorption
- Ancient Coating | Lost Coating – 15% bonus damage
- Ancients Combat Trophy | Lost Combat Trophy – 3/4/5% bonus damage x3
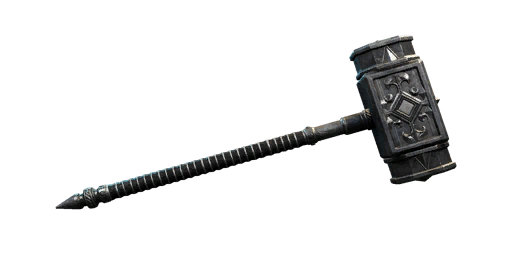
- Strike damage – Hammer, Void damage – Void Gauntlet | Nature/Strike/Ice damage – Life Staff, War Hammer, Flail, Ice Gauntlet
- Topaz gem in weapon for Lightning damage* | Amber gem Nature damage*
Note: *Elemental damage gems in your weapons are simply recommendations based on the elements your enemies are weakest to. Your playstyle may suit non-elemental gems better and you are encouraged to continue using those if so.
Artifact: Blooddrinker Ring
Dropped by Greundgul the Regent.
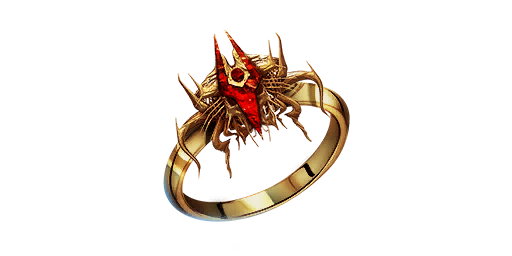
- +32 Magnify (selectable attribute)
- Ghoul’s Harmony: -25% damage, +25% lifesteal. All healing from lifesteal is increased by 5%.
- Empty Socket: Attach a gem to add its effect.
- Leeching: Heal for 7.1% of the damage you deal (Does not trigger off persistent damage or DoT effects).
- Hearty: +10% max Stamina.
Strategy and tips
While it has the same name, this is not the Starstone Barrows you entered on your journey growing up in Aeternum so many levels ago. There is a break in the walls of the dungeon and you’ll find yourself in Amrine, fighting Lost, for a period of time. This is a fun dungeon full of nostalgia, twists and tricks. Be careful of the purple beams as they will kill you outright should you wander into one.
When you emerge from the Lost tunnels and return to fighting Ancients, the first reliquary can be used to let the group through both sets of beams to continue fighting, while the torchbearer goes up the stairs to turn the power off. This saves everyone from standing around just waiting.
Remember to carry extra consumables so you can swap wards and coatings in higher level mutations, it can mean the difference between life and death.
Main Damage Type: Strike
Simon Grey has grown up too and is level 70 in mutated expeditions. His attacks are scaled up accordingly and his Overhead Slam can outright kill a low con, under-geared DPS. Apart from that, this is a fairly straightforward fight.
- Overhead Slam: Simon raises both hands over his head and slams down, causing AoE Strike damage. Look for the movement and be ready to dodge.
- Minions: Simon will spawn 3 lost enemies. If you don’t kill them in time, he will suck them in for a life leech.
- Vomit: Simon’s vomit is pretty toxic and will cause a slow as well as reduce incoming healing.
Main Damage Type: Slash
Greundgul is an Ancient construct with a very large sword. Be careful of the backswing when fighting behind her. She’s quite mobile and will push the group around the arena. Make sure you have someone with a ranged attack to stop her when she gets to the jumping phase.
- Throw Bone: Greundgul throws a bone at the furthest player, that spawns skeletal minions. These are only a mild annoyance unless the fight takes long enough to create too many of them. This can be minimised by the group clumping close to the boss, so the bone and adds get destroyed by everyone’s attacks.
- Jumping Phase: After the first time Greundgul’s health reaches almost zero, she will reassemble herself in the centre of the arena and then leap at a random player, sending out a shockwave of damage with each jump. To control where she jumps, the group should all stack on one player. If you can hit her in the eye as she lands, she’ll stop jumping. The jumping phase repeats periodically until she finally dies.
Interesting Loot
- M3 – Simon Grey’s Set – Medium armour with Arcane Harnessing and Health, upgradeable.
- M3 – Stormbound weapon set for skins – split stat Con/Weapon scaling attribute, Keenly Jagged/Blessed, Weapon Ability Perk.
- Starstone Amulet – Health, Fortified Recovery + Random perk and attribute.
- Starstone Ring – Fire Damage, Refreshing + Random perk and attribute.
- Starstone Earring – Despised, Nimble + Random perk and attribute.
The Depths
Enemy Type: Corrupted
Weaknesses: 30% Arcane 20% Thrust 15% Nature
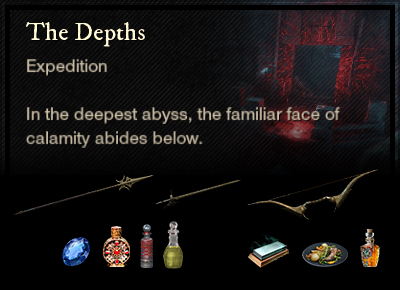
Consumables
- Corrupted Ward potion – 10% damage absorption
- Corrupted Coating – 15% bonus damage
- Corrupted Combat Trophy – 3/4/5% bonus damage x3
- Thrust damage – Spear, Rapier, Bow, Musket, Blunderbuss
- Sapphire gem in weapon for Arcane damage*
Note: *Elemental damage gems in your weapons are simply recommendations based on the elements your enemies are weakest to. Your playstyle may suit non-elemental gems better and you are encouraged to continue using those if so.
Artifact: Lost Stopwatch Amulet
Dropped by Commander Thorpe.

- +32 Magnify (selectable attribute)
- Stunny Gaze: Taunts are active. Generate 300% more threat. Stuns last 1s longer, but base damage is decreased by 10%.
- Empty Socket: Attach a gem to add its effect.
- Purify: When you are hit while below 50% Health, you lose all debuffs (90s cooldown. Does not trigger off persistent damage, DoT effects, or blocked attacks).
- Health: Increase max health by 7% of the base value.
Strategy and tips
There are lots of teleports, trigger platforms and azoth staff nodes in this expedition, as well as a plethora of ranged enemies. Use the twists and turns to your advantage by getting out of their line of sight and forcing them to come to you.
Main Damage Type: Void
The Archdeacon begins the fight in the centre of his arena, although he can move around if players do. He summons Corrupted dogs and has a nasty Ground Wave spell that you’ll need to dodge. Try to keep the dogs in the clump so they get killed by the hits on the Archdeacon.
When he gets to about 50% life, he’ll become invincible and channel a red beam to the east side of the arena. While the Archdeacon is invincible, mines will periodically spawn and if they are not destroyed they will explode and apply Void damage to everyone in the room. If you learn the timing, you can dodge this explosion. Two DPS should step on the teleport pad, which will take them up to a platform where two mages spawn. After killing the mages, one DPS needs to use their Azoth Staff on the node so they can both return to the main arena. Azamela will resume his normal state.
At about 20% health, the Archdeacon starts channelling again, this time with an additional green beam to the west side. You need to split the group and clear each platform as soon as you can. If the dogs are clear, the healer can remain on the ground and heal each side, but usually they will go up with the tank and DPS on the green side. Surviving the bomb damage at this point is the hardest part, clear quickly, dodge if you can, and use potions carefully to stay alive.
Main Damage Type: Fire
Thorpe has been with us since the first sea voyage to Aeternum, so we should be familiar with his moves by now. His great sword does a large amount of Fire damage as well as Slash. Even when behind him, some of his moves swing back, so DPS need to be careful. When he charges, stay out of the firey trail.
Thorpe is pretty chatty and you can use his voice lines to tell what is going to happen next.
- “Ha! Pathetic!” = he goes off the tank and attacks one of the other group members
- “This will be the last time we meet” = he rises and becomes invincible while he casts a beam that spawns two behemoths. Don’t get hit by the beam and kill the adds while the tank holds Thorpe away.
- “Prepare to have your soul crushed” = aka The Big Sticky Finger. Thorpe points a beam across the room and slowly rotates. It’s pretty slow so easy enough to stay away from or you can duck under it.
- “Time to taste Corrupted Steel” = slams down his sword – don’t be too close.
- “I will crush you beneath my heel, ant!” = he summons a beam of fire and directs it at one player, leaving a circle of fire on the floor.
Interesting Loot
- M3 – Expedition Captain’s Set – Heavy armour with Strike Conditioning and Grit Ward, upgradeable.
- M3 – Gleaming Pitch weapon set for skins – split stat Con/Weapon scaling attribute, Keenly Empowered/Blessed, Weapon Ability Perk.
- Deep Amulet – Health, Shirking DoT Cleanse + Random perk and attribute.
- Deep Ring – Keen Awareness, Enfeebling + Random perk and attribute.
- Deep Earring – Empowering Toast, Nimble + Random perk and attribute.
The Lazarus Instrumentality
Enemy Type: Ancient
Weaknesses: 30% Lightning 20% Strike 15% Void
Consumables
- Ancient Ward potion – 10% damage absorption
- Ancient Coating – 15% bonus damage
- Ancients Combat Trophy – 3/4/5% bonus damage x3
- Strike damage – War Hammer, Flail
- Topaz gem in weapon for Lightning damage
Note: *Elemental damage gems in your weapons are simply recommendations based on the elements your enemies are weakest to. Your playstyle may suit non-elemental gems better and you are encouraged to continue using those if so.
Artifact: Spark of Mjölnir
Dropped by Chardis.
- +38 Magnify (selectable attribute)
- Mjölnir Blessing: 99% of hammer damage is converted to lightning, and you deal 20% more lightning damage with both weapons.
- Spark: Mighty Gavel causes a lightning strike that inflicts a 30% weaken for 7s.
- Refreshing Mighty Gavel: Mighty Gavel hits reduce the ability’s cooldown by 10% (Max 2 activations per impact).
- Refreshing Move: Light and Heavy attacks reduce your active weapon cooldowns by 2.5% (0.2s cooldown).
- Cannot add Gem Setting Pin
Strategy and tips
Lazarus is a dungeon of puzzles, the first being the Door Room. Mobs spawn in front of a door with three spaces for symbols above it. The first symbol is lit up, and you need to stand on its match from the circle on the floor in the middle of the room. This will open the door and release more enemies, lighting up the next symbol, and so on. When the third symbol is activated, the door closes and another door to the right opens. The symbols are best activated by someone with range, usually the healer. The key is to open them fast enough to keep the fight flowing but not so fast the team gets overwhelmed. It’s good to kill the archers before moving to the next door.
When you get to Cilla, one person should run across to talk to her while the rest fight the enemies. The next fight, Alcyon the mage, can be challenging. The Overhead Staff attack does heavy Strike damage, while all his spells do Void. Look out for him raising his staff above his head and be ready to dodge. The two archers can also be problematic in this fight, so try to clear them early.
Be careful in the handwashing room, as using the fountain will spawn the mini-boss by the door. Make sure everyone is through before you wash your hands. Use the architecture in the room to get out of the ranged attacks line of sight to bring them to you, or just kill the archers quickly.
Main Damage Type: Arcane
Physical Phase: Cilla is a fairly straightforward fight, to begin with. While the tank holds her aggro, the DPS hit her from behind. She has a buff that increases stacks over time, making her hit harder. There are three ports in the floor, where a stone orb can emerge from. Once an orb has risen, you can interact with it to reset the stacks. This will also progress her into the next phase.
If you can withstand the damage through good tanking and healing, the game forces the next phase by reducing damage done to Cilla until the orb is pulled.
Magical Phase: In the magical phase, it is important that the team clump together. Cilla will cast a spell that makes each player leave a pool of Arcane damage at their feet. You have a few seconds to get to a clear area before she makes it explode. She also shoots out orbs that will root you in place if you touch them.
Main Damage Type: Strike and Arcane
Chardis is about the least mobile boss in the world of Aeternum. He is a giant stone automaton, who uses his detachable hands and a beam from his single eye to attempt to defeat you. When he first awakens, there will be an orb on each side of the room, trapped in a force field. You need to break the field to release the orb, which will spawn a mage over an orb port on the ground. Kill the mage and place the orb.
To fight Chardis, the whole group should stand at the edge of the arena closest to him, in a Sacred Ground. You can block or avoid most of his physical attacks. If you get a symbol over your head, it means you are going to drop a Slicer. Head to the back of the arena to drop it, then return to the fight.
After some time, Chardis will start beaming one player with his eye. This player needs to run to the orb that was placed previously, which will cause both the orb and Chardis to drop to the ground. Once down, players can do increased damage so be sure to use all your Oblivion and Rend to make the most of this advantage.
If there is no orb up, the beam will continue damaging the player it is on. With careful healing, lifesteal, etc, players can continue to fight Chardis while someone is being beamed. But where possible, the orb is always the better option. If an orb is available but not placed, everyone except the healer should work to place that orb.
Interesting Loot
- M3 – Chardis’ Set – Heavy armour with Slash Conditioning and Refreshing, upgradeable.
- M3 – Bone Wrought weapon set for skins – split stat Con/Weapon scaling attribute, Keenly Fortified/Blessed, Weapon Ability Perk.
- Instrumentality’s Amulet – Health, Shirking Debilitate Cleanse + Random perk and attribute.
- Instrumentality’s Ring – Sacred, Infected + Random perk and attribute.
- Instrumentality’s Earring – Healing Heart, Refreshing + Random perk and attribute.