Gear Guide
Where to start with gear
As an essentially classless game, gear is a key aspect of your New World experience. We’re going to discuss the basics of gear while you’re levelling, move on to your options on gearing up once you hit 65, and then provide some resources for building custom Gear Sets for specific purposes at end-game.
Public Service Announcement!
There are some changes coming to gear in the New World: Aeternum update on October 15. We have some info here in case you are interested. Everything in this guide is still relevant and we have updated it to add the extra level in the section Pathways to Gear Acquisition up to 725GS. Please be aware this is based on presumed information from ptr.nwdb.info, is not currently live, and may be subject to change. It has been included in the interest of allowing players to make informed decisions about gear in the weeks leading up to the update.
Contents
Gear while levelling
You’ll soon notice that levelling in New World goes pretty quickly. As such, you will outlevel your gear before you know it, so it’s not really worth putting too much effort into gear until you reach max level.
That said, if you’re finding your Main Story quest is getting tough, you might want to run through the closest expedition to your level a few times to pick up some gear. You’re going to get more than you need, so how do you choose what to keep and what to throw away?
The two most important things to look at while levelling, are attributes and item weight. Obviously, you choose the item with the highest gear score that meets your requirements in those two categories.
Note: if you’re levelling up your faction at the same time, you can pick up gear from the faction vendor that will tide you over while you level. Don’t go out of your way for it though, unless the thought of getting a group for an expedition is too challenging.
When you look at your weapons, you’ll see that they scale with a particular attribute. First off, it’s good to use two weapons that scale off similar attributes, to maximise your effectiveness. So Fire Staff and Ice Gauntlet both use Intelligence, or Great Axe and War Hammer both use Strength. You can also cross split scaling weapons and focus on their common attribute – so Rapier and Spear both use Dex but also have secondary scaling with Intelligence (Rapier) or Strength (Spear). It’s generally best not to use two completely opposing weapons, like Fire Staff and War Hammer, together.
You want the attributes on your gear to match the attribute that your weapons scale with. The only other attribute that is useful to you is Con. Any attribute that you have no scaling for isn’t useful while levelling, although later on you might spec some up to 25 for the milestone bonus.
When applying new attribute points, or respeccing because you got new gear, be mindful of the milestone bumps for each attribute. These give bonuses, so if you have some points to split between Strength and Con, for example, you’re better off going 150 and 100 instead of 140 and 110.
You can see all the Milestone Attribute Bonuses here.
The way equip load works in New World is that it takes the sum weight of your gear and determines your overall load by thresholds. So you can have one or two medium pieces and remain in a light equip load, etc.
- Light = 0 – 12.9
- Medium = 13 – 22.9
- Heavy = 23 +
You can play around with weight combinations using our handy calculator here and if you are interested in a more detailed view, check out the Armor Weights Table on New World Buddy.
This will depend on the role you play. As you’d expect, heavier armour provides more protection (armor rating) and light armour allows you to dodge further. However, in New World, the damage you do is also impacted by equip load and light armour users do 30% more damage than heavy. Healing is even more affected by equip load, with light armour giving 60% more outgoing healing than heavy armour. The main benefits of heavy, on top of the higher armor rating, are that you don’t get staggered for as long when hit by melee, and you get increased block stability.
Hence, outside of PVP, the only people you’ll see in heavy armour are Tanks, with most DPS and all Healers choosing Light armour. As a solo non-healer, you might choose Medium for a balance between protection and damage.
Light Armor
- Base Damage +15%
- Outgoing Healing +30%
- Block Stability -10%
- Your dodge is a quick roll
- Dodge Stamina Cost: 50
- For 1s after taking a melee hit, dodge distance -20% and you cannot run
- [PVP] Crit Damage Taken -15%
Medium Armor
- Base Damage +0
- Outgoing Healing +0
- Block Stability +0
- Your dodge is a quick hop
- Dodge Stamina Cost: 50
- For 0.75s after taking a melee hit, dodge distance -20% and you cannot run
- [PVP] Crit Damage Taken -20%
Heavy Armor
- Base Damage -15%
- Outgoing Healing -30%
- Block Stability +11%
- Your dodge is a directional step
- Dodge Stamina Cost: 55
- For 0.5s after taking a melee hit, you cannot run
- [PVP] Crit Damage Taken -25%
The Gear Score of an item determines the scaling of perks and attributes. There is very little difference between a 699 and 700 GS item, except for 1 attribute point, which adds up across the 10 gear items that you can wear. As we have seen above, attributes determine how much damage you do and extra points can be the difference between hitting a milestone bonus or not. There are 6 extra attribute points per item between 625 and 700, plus increased perk scaling, meaning someone with the Rise of the Angry Earth can have 60 more attributes just from gear than someone who only has the base game.
Tier is more closely linked to Gear Score than Rarity and corresponds to the level of materials that would be used to craft the item. So items of different rarity across a similar gear score range will have the same tier.
Rarity is displayed as the colour of the item and determines how many perks an item has. Players usually see Attributes, Gem Slots and Perks individually, while devs call all of these items “Perks”. Hence, you might hear people refer to Legendary items as having 3 perks but devs talk about them having 5 perks. We’re going to use the 3 perk system for this article, as that is more commonly used in-game.
- Artifact – Orange – 700+GS – Attribute bonus, Gem Slot, 4 Perks
- Legendary – Gold – 600-625, 675+GS – Attribute bonus, Gem Slot, 3 Perks
- Epic – Purple – Attribute Bonus, Gem Slot, 2 Perks
- Rare – Blue – Attribute Bonus, 0-1 Gem Slot, 1 Perk
- Uncommon – Green – Attribute Bonus, 0-1 Perk
- Common – Grey – No bonuses


- Perks with overcapped max stacks, e.g. Refreshing 5/4
- Weapon Ability perks if you don’t use that weapon, e.g. Enfeebling Maelstrom for a healer
- Elemental Harnessing perks if you don’t use that type of elemental damage, e.g. Fire Harnessing on a Physical damage build
- Grit Ward or Thwarting Strikes if you don’t get grit often
- Trenchant perks if you don’t do heavy attacks
- Shirking perks if you don’t successfully dodge attacks
Once you hit max level, that’s when you can really start investing in your gear. There are a few different strategies, depending on how much gold you have. But, assuming you just ran through the Main Story to max level and didn’t deviate into crafting or farming on the way, you probably don’t have much gold.
The first thing you can do is head to the Trading Post and see what kind of bargains you can pick up. The aim is to hit 675+ gear score so you can run M1 and M2 mutated expeditions for loot. I want to emphasise that you shouldn’t spend too much gold here, you’re just looking for the right attribute for your weapons, the right weight for your equip load, and a Gear Score that will get your total over 675.
The way Gear Score works is that not every piece is weighted equally. Weapons add the most to your overall score and boots add the least. So keep that in mind when shopping – high GS weapons will do wonders while high GS boots won’t make that much difference.
Here’s a list of the gear score modifiers for each slot:
- Weapons – 210
- Chest – 189
- Helm and Pants – 108
- Gloves – 81
- Amulet, Ring, and Earring – 80
- Boots – 54
Once you’ve put the base set together, you can run M1 and M2 mutations, and join Elite Chest Runs for drops. Keep an eye out for upgradable Named items and any gear that’s better than what you’re wearing.
Loot biasing was added in Season 3, and what this means is that you have a higher chance of loot dropping that matches whatever you are wearing. For example, I often wear the Attuned Leather Pants, which are medium weight, and nearly all the pants in my storage are medium.
This doesn’t mean you’ll only get the same type of gear you already have, just that most of your drops will be biased that way.
The attribute you have your Magnify set to will also impact the attributes you get on dropped gear.
The areas loot biasing impacts are:
- Attributes on dropped gear
- Weight of dropped gear
- Most common weapon type drops
You won’t see items with Magnify on them until you reach level 65. It’s a special kind of attribute that changes, depending on what you do with it. By default, it add its points to whatever attribute is highest. But you can also select any attribute to apply it to. As you can imagine, this allows items with Magnify on them to be flexible across multiple builds.


The other thing you want to start collecting as soon as you can, even before you start perfecting your gear sets, is protection amulets. These make life so much easier in all kinds of content and are a great investment.
There is a protection perk for every damage type, which gives 15% protection against that one type of damage. This perk is only available on amulets. If you add a matching gem to the amulet, you’ll have 21% protection from one item.
You can check the Trading Post for cheap protection amulets to get started, or you can start investing in some you’ll be able to keep.
If you make sure all your protection amulets have the same attribute (Con or Magnify – personally I prefer Magnify as that gives more flexibility), then swapping them out for different fights doesn’t change anything in your attribute set up.
- Flame Protection: Empty Hearth – dropped by Commander Marius in Empyrean Forge – add Ruby
- Frozen Protection: Heart of Cold – dropped by Gelus in Glacial Tarn – add Aquamarine
- Void Protection: Encroaching Corruption Amulet – found in Invasion caches – add Amethyst
- Nature Protection: Lifering Amulet – upgrade with Shard of Enchanted Earth – add Amber
The first four are for mutations and you should prioritise getting those or something like them. The rest are for specific boss fights or PVP. Slash and Strike protection are your next priority for PVE mutation bosses, Thrust can be good for Outpost Rush, and Arcane and Lightning are niche.
- Thrust Protection: Tanglevine Amulet – drops in Elysian Wilds – add Emerald
- Slash Protection: Soul Shroud Amulet – drops in Myrkgard – add Moonstone
- Strike Protection: Sporelight Amulet – drops in Elysian Wilds – add Jasper
- Arcane Protection: Lifering Amulet – upgrade with Drop of Ancient Essence – add Sapphire
- Lightning Protection: Lifering Amulet – upgrade with Shard of Sparkmetal – add Topaz
Lifering Amulet (Health + Divine) can be looted at Tor To-Riven in Edengrove and you’ll often see a weapon levelling Lifering farm going that you can join. If you’re having no luck with drops, Azoth Battery (Health – Dense Ennead materia) or Azoth Crystal Amulet (Divine – Dense Mutator materia) can be crafted at the Gypsum Kiln and could be used instead.
When you finish an expedition or chest run, you’ll find your inventory is full of a range of gear that you need to evaluate. This can be a bit overwhelming, so here’s my process for making it a bit easier.
Make sure you always lock the items you want to keep, even if they are currently equipped or in a Gear Set. It’s very disappointing to accidentally delete your main weapon because you became overloaded while trying a new one out.
A handy icon you may not have noticed is the Salvage All button. It’s at the top of each category and allows you to salvage in bulk. Don’t be afraid to click it, you’ll get a menu asking which Tier items you’d like to salvage before anything actually gets deleted. Select Common, Uncommon, and possibly Rare, depending on your level, and go ahead and salvage it all. It’s generally not worth your time to evaluate it, even if it’s a higher gear score, due to having less perks.
- Level 10-30 – salvage all Common (grey)
- Level 30-60 – salvage all Common and Uncommon (grey and green)
- Level 60+ – salvage all Common, Rare, and Uncommon (grey, green, and blue)
Do keep an eye out for shiny Uncommon or Rare crafting gear and lock it when you find it.
Now you can start sorting through what’s left. Sort by Gear Score to find the highest-level items, then evaluate them by attributes, equip load, good perks, rarity, and gear score.
The next step is to start designing gear sets around specific types of gameplay. This is where a lot of the fun comes in and to make the most of New World, it’s good to get used to respeccing. You can play any class or style that you have the gear for.
I’m not here to make money for Amazon, but even if you buy nothing else from the Cash Shop, it is worth investing in Gear Set Slots. You can have up to 9 Gear Sets, which can hold your armour, weapons, jewelry, heartrune, ammo, and consumables. These don’t weigh anything so it’s a good place to stash all your potions.
To equip everything in a set, it’s one click or button press. These are so convenient that I really wish they’d let us buy more of them!

Once you’ve built a set using the advice below, you should put some gems in it. If you’re planning to do mutations, the safest bet is to put Opals in all your armor, plus your Ring and Earring. Depending on the mutation, swap your Amulet to the appropriate Protection.
If you’re going to run M3, you need to use the appropriate gems for the mutation. It’s quite inconvenient to re-gem all the time, so a good thing to do is create four matching gearsets, each with a different gem. Note: if you’re not sure about gems, there’s a good gem guide here.
If you main Healer or Tank, you can make specialised sets for those builds. But if you play a flexible DPS, you need the ability for these sets to work with different weapons and attribute distribution. I recommend building a Magnify set, using mostly Azoth Crystal gear. You’re aiming for four sets, each with:
- 4-5 Enchanted Ward
- 4 Refreshing
- Mutation Gems and matching Protection Amulet
The four gem types for mutations are:
- Cut Pristine Ruby (Fire)
- Cut Pristine Aquamarine (Ice)
- Cut Pristine Amethyst (Void)
- Cut Pristine Amber (Nature)
I use four gear set slots for these and keep my most common weapons in them too. Then I swap around weapons and rings (since rings are usually linked to a damage type) as needed. I keep Opals in my rings and change the gem to the mutation type if needed.
I also keep some spare boots and gloves in my inventory, with weapon ability perks on them. When I’m using a weapon that really benefits from a weapon ability perk, such as Relentless Freedom for the Greatsword, I’ll swap that one in and gem to match (or leave the Opal in if I think I can get away with it). This also helps with the split stat issue for Greatsword, as the pieces I swap in don’t have Magnify. For most other weapon builds, just assigning the Magnify points to an attribute of my choice is enough for the attribute distribution to work.
You should include an Artifact in your four sets. I use Attuned Leather Pants, which have Refreshing, so I only use 3 Azoth Crystal light pieces and add one other medium piece – Graverobber’s Hat or Isabella’s if you want to keep Enchanted Ward and Magnify. The other option is to use Koya’s Kneeguards and lose the extra attribute points but get protection from ranged attacks, Enchanted Ward and no Refreshing so you can have 4 pieces of Azoth Crystal.
You can use these sets in any content, not just mutations. Myrk run? Chuck on the Void set with Slash amulet. Helios? Fire set. Zygoramet’s Arena? Nature set and swap in a Strike amulet.
The importance of full Magnify on the base sets, apart from weapons and rings, is the key. This means you can use the same set as a bruiser, archer, or mage.
There are many ways to get gear, some are faster than others, some are free apart from time and others cost a lot of gold. I’m going to run through these from cheapest to most expensive.
The cheapest gear you can get is something that drops without any need for an upgrade. Most items that you will find, if they’re not Named, will be randomly generated around your loot bias. This means that getting 3 perfect perks is quite rare, while getting the right attribute and equip weight is fairly common.
You can get up to 700GS procedural (random perk) loot from mutated dungeons, open-world elite areas, and the PVP track.
I store every 700GS drop without evaluating it, just in case there’s a build I want to make in the future that I don’t know about yet. Then when I’m making a new build, the first place I search is my storage.
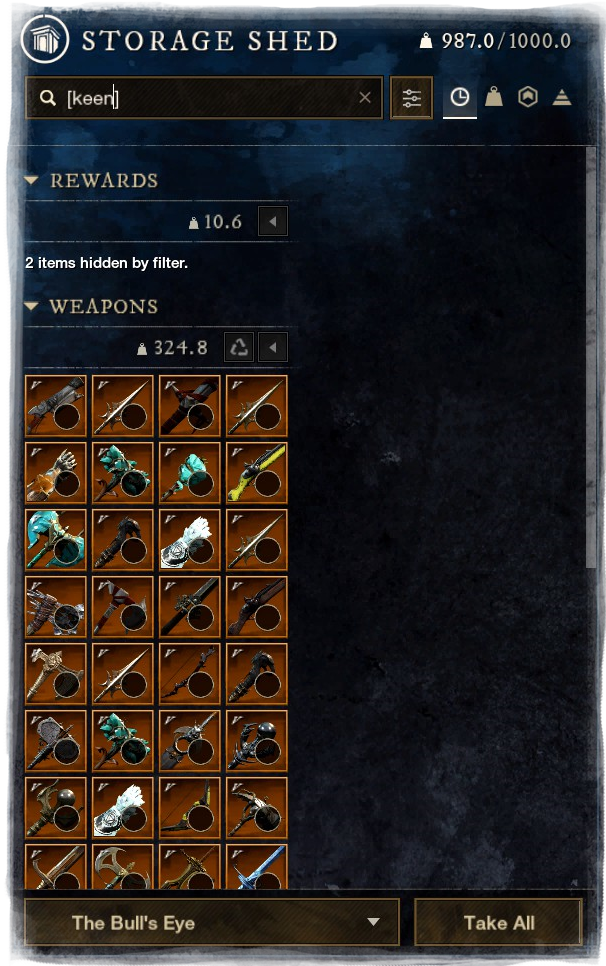
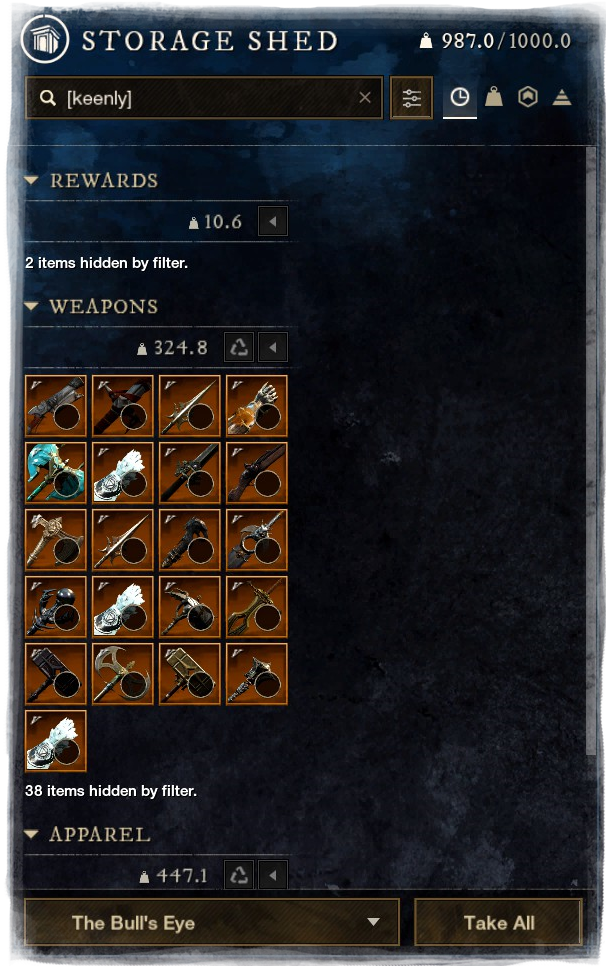
There is a little-known perk filter built into storage search, so you can type the perk name you’re after in square brackets, for example [keenly jagged] will show all items with the Keenly Jagged Perk. If I just typed [keen], I would get items with Keen, Keenly Jagged, Keenly Empowered, Keenly Fortified, Keen Speed, Keen Awareness, Keen Berserk, Keen Beacon, Keen Tondo, Keen Vault Kick as well.

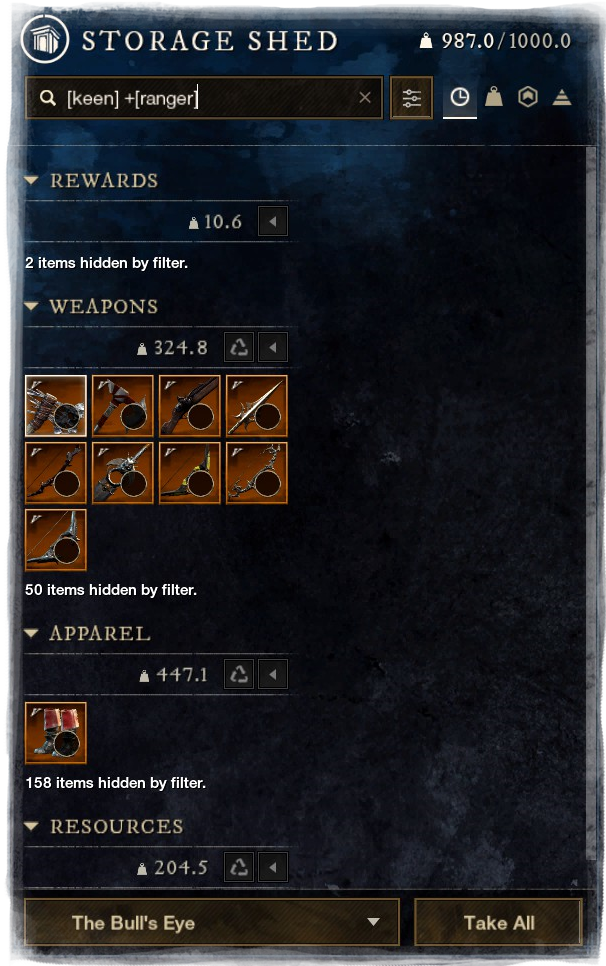
Note: you need to use attribute affixes to search for them – Dex = Ranger, Str = Soldier, Con = Sentry, Foc = Sage, Int = Scholar.
If you’re lucky, you might have something in your storage that fits the new build.
Next stop is the Gypsum Kiln. If you’re been running mutated expeditions for a while, you’ll have built up a stash of materia. It’s good to store this in a town with a kiln – Reekwater is perfect if you have your inn set there, as it’s right next to the storage shed and kiln. Other places you can find a Gypsum Kiln include Ebonscale Reach, Edengrove, Brimstone, and all the Outposts.
To see whether there’s an Expedition replica that has the perks you want, you can browse the kiln itself, or check this list on New World Database.


Note: the hovered item card shows purple because the final perk hasn’t been applied yet.
Expedition replicas roll at 700GS and will be Legendary. They have two standard perks and the third perk is random. If you want to change the final perk, you can do this by Upgrading.
Now we get to the point where we’ll have to spend some gold. Before getting into the more expensive options, it’s worth checking the Trading Post and seeing whether anyone is selling what you want at a reasonable price. Anything below 7-15k (depending on slot) is worth buying.
To narrow down your search, make sure you use the Perk Filter on the Trading Post. Set your minimum gear score, attributes and then try adding all your perks. You can click “Only selected” to show items that have all the perks, otherwise it will display items that have any of the perks listed.


Crafting is pretty reliable these days and if you only need two exact perks and are flexible about the third, Golden Scarab crafts are a good option. They cost around 7-15k in materials, depending on market values, craft mods used and slot crafted. Chestwear costs more to make than gloves.
If you don’t have crafting skills, trophies, gear, buffs and knowledge, you can always ask a friendly crafter to make gear for you. Most people will craft if you provide the mats, either for free or for a small tip. If you’re on Delos, I’ll craft for you at no cost if you bring me the materials.
You can look up recipes on nwdb.info to see which mats you need (make sure you’re looking at the recipe that requires 3 Golden Scarabs and a Matrix), and if you want Armor crafted, I have a materials calculator here.
The next option is upgrading Named items. A lot of people suggest this as the only way to get gear, but as you can see, there are a number of cheaper options. Upgrading Named items costs about 20k gold and 3 days cooldown, if you don’t pre-purchase your Chromatic Seals.
I keep one of each Named item in my storage, so that I don’t have to farm it if I find a build that needs it. But, if you don’t already have the item, it’s easy to find out where it drops and go farm it. I also recommend buying Chromatic Seals in advance and keeping a buffer of at least three (I aim for 12).
We have an extensive guide to Upgrading Items here.
If you are set on three exact perks and there are no Named items that have two of them, your final option is to make or commission a Prismatic Scarab Craft. This allows to you choose everything about the item so you can make Best in Slot gear. Of course, this comes at a cost.
The Prismatic Scarab itself is made of 10 Golden Scarabs. On top of that, you will need an Azoth Inductor, which is a Bind on Pickup item that costs 25k gold and 75k faction tokens from the Faction Shop. If you’re providing mats for someone else to craft for you, you’ll need to cover the 25k cost of the inductor, plus add a tip for the faction tokens.
You’ll also need Prismatic mats at about 20x the amount of a regular craft, plus 10 Timeless Shard and 50 Attribute craft mods. The three perk craft mods can also be expensive if they are rare and popular. Overall, you’re looking at from 75k to 200k+ gold in materials, depending on the piece.
Finally, we have Artifacts, which are special items that have unique perks. Many builds will include a couple of artifacts. You can equip one Armor, one Weapon, and one Jewelry artifact at a time.
Artifacts are the only pre-Aeternum items that can be upgraded to 725GS.
Some recommended artifacts are:
- Attuned Leather Pants – you get these from completing the Elysian Wilds MSQ and they give extra attribute points. Very good general armour for light or medium equip loads.
- Featherweight – easy to get by killing an Elite mob in Elysian Wilds. Weighs nothing so allows you to create gear sets with higher armor rating while remaining in a lower equip load.
- Finisher – might need a few other people to help you get it from an Elite mob in Elysian wilds. Very powerful rapier.
- Serenity – comes from the PVP track and quite hard to get. It’s a random chance on Checkpoint 3 at level 29, 39, 59, 69, 79, 89, 100-103, 105-113, 115-123, 125-133, 135-143, 145-153, 155-163, 165-173, 175-183, 185-193, 195+. Very good heavy attack weapon if you can get it.
- Blooddrinker – drops from mutated Starstone Barrows, so you can only get it while that’s up on rotation. Great safety ring for soloing or situations where you can’t get enough healing. Does reduce your damage output though.
There are many more good artifacts but the list is already getting a bit long. You can find a list of artifacts here, along with information on how to get them and what the quests are to unlock the perks.
New World: Aeternum brings an increase of the Gear Score cap to 725. However, there are only a few ways to get this gear and they are heavily time-gated, so think of this as an end-game extension rather than a normal expectation for gear score.
The new items that can reach 725 GS come from three main activities – the Hive of Gorgons 10-player raid, the Well of Fortune for PVP zone spoils, and the Trial of the Devourer 20-player elite trial (Sandwurm).
You can receive items with up to 725 GS as drops from the three bosses in the Hive of Gorgons. The armour and jewelry come with Magnify as the attribute, while the weapons have their primary damage scaling attribute (Great Sword has Strength). All have a gem slot and three random perks.
- Jewelry drops from Echidna
- Armor drops from Typhon
- Weapons drop from Broodmother Medusa
These are Bind on Pickup, so you will need to loot them yourself. You can also get Named Hoplite items from this Raid.

You can receive random perk items up to 725 GS from the Goldcursed Epic Crate, Rare Crate, and Specific Item Type (eg Helmet) Crate that you can trade your Mystic Doubloons for at the Well of Fortune. This will be the quickest way to boost Gear Score over 700 to begin with. The specific crates cost 250 Mystic Doubloons for armor and trinkets and 375 Mystic Doubloons for weapons. The Epic Crates only cost 35 Mystic Doubloons and you can buy 3 per day, while the Rare Crates cost 10 and you can buy 5 per day.
For guaranteed 725 GS, you’ll need the Apex Goldcursed crates. There are 11 different types of crates, depending on what type of item you want. They cost 1500 Mystic Doubloons for Armor and Trinket crates, and 1800 Mystic Doubloons for Weapon crates, plus a Goldcursed Coconut. You are limited to crafting one Apex Goldcursed Crate of each type per week, plus you can only loot 1 Goldcursed Coconut each week, and it is used for other things such as upgrading Apex Named items and Artifacts.
- Ranged Weapons
- Magic Weapons
- 1 handed Melee Weapons
- 2 handed Melee Weapons
- Shields
- Helmets
- Chest Armor
- Gloves
- Leg Armor
- Boots
- Trinkets
The weapon crates have the chance of dropping a Named item or a 725 weapon of that type with all random perks. The armor and trinket crates only drop random perk items.
The new Major Sandwurm spoils from the Trial of the Devourer will drop Named items and semi-random Sclerite weapons at 710GS. These have a set attribute and one perk, with two other random perks. You can only receive one crate per week.
The new Minor Sandwurm spoils is awarded once per day, on successfully defeating the Sandwurm. These contain 710GS random Sclerite armour pieces with a single set perk or attribute and the others random. You can also get 710GS jewelry with 2 static perks.
Each area has a family of Named items that contains one of each armor slot in every weight category, one of each weapon and jewelry type.
The Named items that drop from the Hive of Gorgons are called Hoplite. It looks like they drop at 725 Gear Score. These come with one random perk that can be reassigned during Upgrading, and two fixed perks. The armour and jewelry come with Magnify as the attribute, while the weapons have their primary damage scaling attribute (Great Sword has Strength).
- Jewelry drops from Echidna
- Armor drops from Typhon
- Weapons drop from Broodmother Medusa
The base perks for the armor are very good general perks, so will be sought after for adding specialist third perks to, especially the Light armor which will basically be an upgrade for Azoth Crystal. All the footwear has the new Hasted Vigor perk.
- Heavy – Enchanted Ward and Health – Boots Health and Hasted Vigor
- Medium – mix of Enchanted Ward, Health, and Refreshing – Boots Refreshing and Hasted Vigor
- Light – Enchanted Ward and Refreshing – Boots Refreshing and Hasted Vigor
The majority of the weapons have the new Distained Infliction perk paired with Keenly Jagged to make sure there is a DoT for it to trigger off. The exceptions are:
- Hoplite Flail (Refreshing Move and Crowded Bludgeon)
- Hoplite Longsword (Refreshing Move and Trenchant Rend)
- Hoplite Life Staff (Blessed and Fortifying Sacred Ground)
The Amulet has a new perk on it and the Ring looks pretty good:
- Hoplite Amulet (Unimpeded and Health)
- Hoplite Ring (Blood Letting and Hearty)
- Hoplite Earring (Refreshing Toast and Refreshing)
There is one Named item of every weapon type in the Well of Fortune. You can get them in the following ways:
- Craft 710GS for 750 Mystic Doubloons
- Gamble for 725GS in an Apex Goldcursed weapon crate for 1800 Mystic Doublons and a Gold Cursed Coconut
The 710GS version can be upgraded to 725GS for 1250 Mystic Doubloons, a Goldcursed Coconut, and 300 Dark Matter.
The new Sandwurm Named items are among some of the most interesting in the game, many having illegal perk combos. Including weapon perks on armor! These will drop from 700-710 GS and can be upgraded to 725.
- Silken – Light
- Dune – Medium
- Sandlion – Heavy
- Duneborn – Weapons


Like upgrading to 700Gs, only certain items qualify to be upgraded to 725GS. These are Artifacts, Hoplite Named items, Apex Goldcursed Named Weapons, and Silken, Dune, and Sandlion 700GS+ Named items.
Upgrading Artifacts
All artifacts will be upgradeable to 725GS at the Gypsum Kiln, using a special ingredient from either the Raid or the PVP zone.
- Goldcursed Coconut (PVP zone), OR
- Gorgonite Inductor (PVE Raid)
The 700GS Artifact upgrade recipes are still in place for both old and new artifacts, so it seems we will need to upgrade twice for maximum power.
With the Goldcursed Coconut being on a one per week cooldown, and the Gorgonite Inductor being linked to whatever the Hive of Gorgons loot limit is, and with both of them having other useful purposes, upgrading an Artifact to 725 isn’t something to take lightly.

Upgrading Apex Goldcursed Named Weapons
If you get an Apex Goldcursed item in an Apex Goldcursed crate or a Goldcursed Epic Crate that is lower than 725 GS, you can upgrade it to 725 at a Well of Fortune.
The materials you need all come from the PVP zone. Importantly, you don’t need any matrices or chromatic seals.
The Goldcursed Coconut is on a weekly cooldown, so you can only loot one per week. It’s also used in a number of other recipes (see Apex crafting below and Artifact upgrades above) so you’ll have to choose where you want to use it wisely.

Upgrading Hoplite Named items from the Hive of Gorgons
Hoplite items drop from the Hive of Gorgons Raid and are Named items with specific perks. If you want to change the third perk, you can upgrade in the same way that Named items are done now.
Take the item to a Gypsum kiln and look for the recipe. It uses the same ingredients as 700GS Named item upgrades except you need a Gorgon’s Eye as well. This is a tradeable drop from the Hive of Gorgons Raid, and it will be interesting to see how common or rare they are, as they are needed in quite a few recipes.

Upgrading Sandwurm Loot
The new Sandwurm items can also be upgraded to 725 Gear Score at the Gyspum Kiln. Again, we’re seeing a Matrix, Chromatic Seals, Dark Matter, and a Gypsum Orb, with the addition of 2 Gorgon’s Eyes from the PVE Raid.
The new Sandwurm gear is now some of the most interesting in the entire game, and with both illegal perk combos and the ability to reach 725 gear score, has the potential to be best in slot for certain builds.

Finally, you can craft some items up to 725 Gear Score. But, you will need some special items to do so. The Hive of Gorgons drops two important ingredients – the Gorgonite Inductor and the Gorgon’s Eye. The Inductor is Bind on Pickup but the Eye appears to be tradeable. There is also a chance to receive a Gorgonite Schematic, which also seems to be tradeable, and this provides the only recipe for skill-based 725GS crafting.
Gorgonite Schematics
The recipe for the 725GS Gorgonite Schematic crafts uses a similar amount of materials as other normal crafting recipes, but slightly more. For example, the Gorgonite glove recipe require 6 cloth, 6 leather, and 2 ingots, while a normal one takes 4 cloth, 4 leather, and 1 ingot. Each craft also requires a Gorgon’s Eye, which you can get from the Hive of Gorgons or the Trading Post if other players choose to list them.
The schematics themselves are new rare drops, so it might be challenging to find a crafter who is able to make these items.
The armor and jewelry roll with Magnify and weapons with the primary damage scaling attribute for the weapon type, removing this element of randomness. As for how many perks we can apply, that remains to be seen and this article will be upgraded when we know.
Note: datamining show that attribute selection has been streamlined on many recipes and we may see the option to select an attribute here too.
Once the market fills up with Gorgon’s Eyes and Gorgonite Schematics, this looks to be a fairly cost-and-time-effective method of getting 725GS items.


Gorgon Essence BIS crafts
This isn’t strictly crafting as it doesn’t require craft skill or gear, but you can put together a 725GS item with all the perks you desire, if you have the resources. The Gorgon Essence crafts are the 725 equivalent of Azoth Inductor crafts, but do not require craft skill, just the ability to complete the Hive of Gorgons raid.
You will need large amounts of prismatic materials, a matrix, and a prismatic scarab, as well as a new Bind on Pickup crafted item, Gorgon Essence.
This is made with:
- 1 Gorgon’s Eye
- 1 Gorgonite Inductor
- 3 Aquae Rejya
- 20 Saltpeter
- 10 Water
- 3 Infused Alkahest

This is a fairly complicated question, as different perks are good in different builds. We have some links to good build sites below and I recommend looking through them to get an idea of specific perks.
If you’re not sure how you’re specialising or really just want to make a flexible basic set, here are some general perks that will keep you functional. To keep this simple, many good perks have been left out.
- Enchanted Ward
- Health
- Refreshing (on 4 items max – may go on jewelry if needed)
Azoth Crystal gear is a great general set. It drops in every weight type and in every M2+ dungeon, as well as being able to be made at the Gypsum kiln with Dense Mutator Materia. It comes with Magnify, Enchanted Ward, and Refreshing, and the third perk is random.

- Vicious
- Attunement
- Keenly Empowered/Jagged
- Weapon Ability Perk
We recommend Vicious over Enchanted, because it adds 7% to all critical hits, including those from abilities, while Enchanted only adds 5% to light and heavy attacks.
Attunement (Arboreal, Flame, Abyssal, Frost) adds 14% additional damage as that elemental type.
Perks that require a trigger – Shirking – dodge an attack, Trenchant – charged heavy attack, Thwarting – have grit – can be good for specific builds and not others.
“Keenly” perks require a critical attack to occur for them to proc, so they work better on weapons with a high native crit chance and modifier, for example, Rapier with a 9% native chance and 1.4x modifier will get more benefit from Vicious than a War Hammer with a 6% native chance and 1.2x modifier.
- Amulet – Health, Protection (see above), Divine, Stamina Recovery
- Ring – Hearty, Damage for your weapon type, Keen Awareness or Debuff extension for your damage type
- Earring – Refreshing Toast, Healthy Toast or Empowering Toast, Nimble
Regenerating and Despised on your earring will add threat, so yes for Tanks and no for everyone else unless you’re soloing.
The perks above are a very general idea of decent perks. Just about every perk has a way to be used, and some builds will have essential specialist perks. Elemental damage type builds will use a Harnessing perk on every piece of armour, for example. Weapon ability perks are essential in some builds. Rather than try to explain all the options, it’s probably better just to look through some builds and get an idea from there.
There are a few new perks in the New World: Aeternum update, which appear on Named items from the new Raid and PVP Zone. The craft mods are attained through this content as well.
- Thorny Reflection (chest and hand) – crafted at the Well of Fortune – 75 Mystic Doubloons – 1 per day
- Empowered Cleave (ring) – crafted at the Well of Fortune – 75 Mystic Doubloons – 1 per day
- Penetrating the Empowered (weapons) – crafted at the Well of Fortune – 75 Mystic Doubloons – 1 per day
- Distained Infliction (weapons) – salvaged from Hoplite and Gorgon’s weapons – Hive of Gorgons
- Hasted Vigor (armor) – salvaged from Hoplite and Gorgon’s armor – Hive of Gorgons
- Unimpeded (amulets) – salvaged from Hoplite and Gorgon’s jewelry – Hive of Gorgons
You can find all this information put together in builds made by various players with loads of experience in the game. When you’re looking at a build, remember that if you don’t have the exact same item, it doesn’t matter, you just need the perks/attribute/equip weight to match.
This is a beautiful and useful site made by Honzy. As well as a wide range of PVE builds, some submitted by Content Creators and some made through expert knowledge in-house, they also provide some beginner 65 Squire Squad builds. This can be really helpful when you have gear overwhelm, as they’re narrowing it down to single perks per item.
You can visit Mutation Academy here.
Sherlock Gnome has put together an updated collection of build information, which grew out of the original M11 site for PVE speedrunners. He also includes some Dungeon information and general info about things like Buffs and Debuffs, Gems, etc.
You can peruse newworldbuilds.com here.
NW Champ is made by TrickTrick and includes lots of PVP builds as well as some PVE. The builds are quite simple, with attributes, gear cards, and weapon loadouts only. No discussion on how to play the build is provided but the layout is very clean.
Have a look at NWChamp.com.
The idea behind our build section is to share builds from a range of players. Each build comes with a description of how to play it, as well as information about the gear, attribute and weapon ability loadouts.
You can check out our builds here and feel free to submit your own.
Hopefully, there’s enough information here to get you started and you’ll learn the rest as you play the game. Making new builds and theory crafting is a big part of what makes end-game New World enjoyable, or you can just perfect your one set and be happy playing that. It’s up to you.

4 Comments
[…] 3 release on October 3, 2023. It will remain on this page for historical purposes. You can find the new Gear Guide […]
[…] nwdb.info to search for items with perks that you want, and set the Upgradeable filter to Yes to find Named Items you can […]
[…] For more details, see Pathways to Gear Acquisition in our Gear Guide. […]
[…] all very well to choose gear that’s effective in combat, but the most important thing in Aeternum is how your character looks. After all, the avatar fills […]