This week's mutation is endlessly Eternal.
With the release of Season 7, this is our first go at Unified Mutations. We’ve been pretty lucky to draw two synergistic expeditions for our Void mutation – Tempest and Dynasty. The curse is also a gentle one, I’d much prefer a Dip and Nae Nae over the wild chaos of Frenzied. M3 has been added to the Activities Group Finder, but it doesn’t seem as if there are any resistance requirements, so it will be interesting to see how that goes.
The new Mutator and Hive Reward cache has been added to give more options for gaining 725GS gear. As well as a pile of other ingredients, each one requires 40 Mutated Dust. This only drops from M3 caches, with 4 awarded in a Gold cache and only 1 in a Silver. Nothing for Bronze. The reward for crafting one of these is 1-3 random 725 Gorgon’s items. Time will tell if it’s worth it.
For the record, the mutations did rotate at their regular time, but given it was so close to the patch, I elected not to do an article. They were Overgrown Barnacles, Icebound Tempest, and Eternal Dynasty.
Contents
Mutation

- Abyssal – 50% of all enemy damage is Void.
- Oblivion – Attacks cause Leech on hit – M1: 20% Void DoT damage for 90% enemy heal, M2 & M3: 30% Void DoT damage for 120% enemy heal.
- Paranoia – Hitting enemies with this title applies stacks of Paranoia. At 4 stacks a Void pool appears at your feet – M1 40% Void damage, M2 & M3: 70% Void damage.
- Creeping – Enemies grant Void Empower to surrounding enemies on death, increasing Void damage by 50%.
Promotion

- Enraged – Each hit on an enemy generates a stack of Fury. At 20 stacks, the enemy grows 15% larger and does 50% increased damage.
- Shattering – Enemies deal additional stamina damage and apply a bleed on breaking your block. M1: 20% increased stamina damage, 5% bleed, M2 & M3: 75% increased stamina damage, 8% bleed.
Curse

- Combustible – Selects the player with the lowest percent health and surrounds them with a Void aura. When the aura expires, nearby players receive Void damage of 50% max health.
- Shrivelled – All players except the one with the Void aura get a Shrivelled Weaken debuff, reducing damage and healing by 50%. Stepping into the Void aura cleanses the debuff.
Consumables
- Void Protection Amulet
- Amethysts in Armor/Jewelry
- Desert Sunrise
- Void Absorption Potion
- Powerful Honing Stone
- Attribute bonus food
Gearing up
- M1 – Opals in your armor is fine
- M2 – Add the Void Protection Amulet
- M3 – Swap most of your Opals for Amethyst
- Enchanted Ward – Aim for 4 or 5 pieces with this perk.
- For more detailed advice on gear, check out our Gear Guide.
Count your shots
Paranoia enemies will spike you with a Void pool for every 4 times you hit them, so count your shots and then dodge. This is one time that being in the clump can be bad for your health, if you need to stand near others – stay agile!
Kill the creepy ones last
Creeping enemies empower their friends when they die, so if you notice their title, try to keep them for last. This is particularly true if it’s a mini-boss – DPS should kill all the trash mobs while the tank holds the creepy one.
M2 - The best defense is a good offense
It’s best to get in first and kill these guys fast. After being hit 20 times, Enraged enemies are going to get bigger and stronger. Your tank will also need to draw on more skills than right-click, with Shattering enemies around. A side-step can help avoid a hit without using precious stamina, if you have the footwork skills for it.
M3 - Dip and Nae Nae
Desiccated is the easiest to manage of all the curses. If you get the Void aura around you, be sure to dip all your teammates to remove their Shrivelled debuff. Then quickly move (or “Nae Nae”) away, so you don’t spike them with the chain Void.
Barnacles and Black Powder
Enemy Type: Lost
Weaknesses: 30% Nature 15% Ice 10% Strike

Consumables
- Amber gem Nature damage*
- Lost Ward potion (Angry Earth Ward for Nereid) – 10% damage absorption
- Lost Coating (Angry Earth for Nereid) – 15% bonus damage
- Lost Combat Trophy (Angry Earth for Nereid) – 3/4/5% bonus damage x3
- Nature/Strike/Ice damage – Life Staff, War Hammer, Flail, Ice Gauntlet
Note: *Elemental damage gems in your weapons are simply recommendations based on the elements your enemies are weakest to. Your playstyle may suit non-elemental gems better and you are encouraged to continue using those if so.
Artifact: Void Darkplate Heavy Chestwear
Dropped by Nereid.

- +32 Magnify (selectable attribute)
- Dark Reinforced: Your armor is increased by 20%.
- Empty Socket: Attach a gem to add its effect.
- Enchanted Ward: -4% damage from light and heavy attacks.
- Physical Aversion: Receive 4.5% less damage from ranged, physical attacks.
Strategy and tips
This is a very pirate-y expedition, with lots of explosions and gunshots. Watch out for bombers – you can root them and run, or if you’re clever you can lead them to their friends and use them as a weapon. To beat the mutation timer, players generally tend to skip past mobs and group them up. Be aware of ghosts and try to kill them rather than skipping, since they cast spells that slow you down.
Middle Boss: Admiral Blackpowder
Main Damage Type: Fire
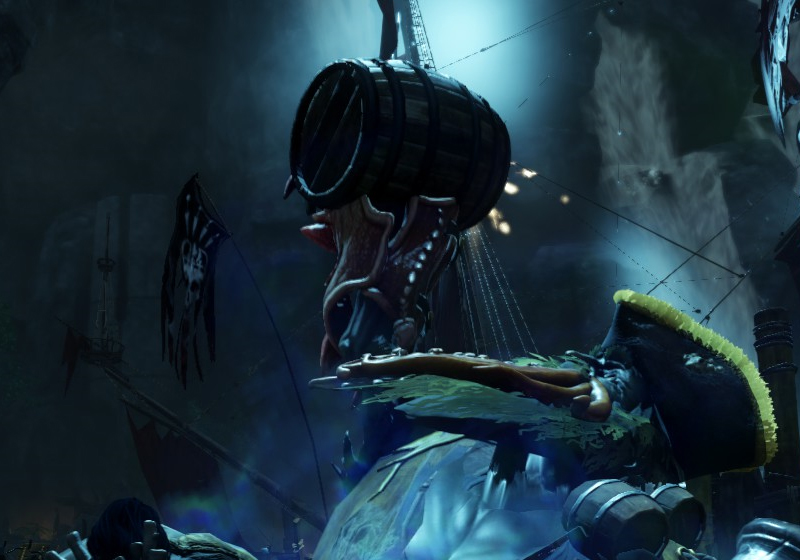
The Admiral is a huge pirate with interesting feet and some really big balls. The fight seems deceptively simple at first, with everyone beating on him. He throws explosives, and if you see a red circle on the floor, you’re going to take some fire damage.
At about 75% health, he jumps up onto the ship at the back of the arena so you can’t hit him. He’ll usually spawn a group of minions at the same time. The Admiral throws down kegs and cannon balls, and lines of fire appear on the floor. The kegs drop a radius of black powder which causes a Fire DoT. You can pick up the cannon balls, load them into the two cannons at the side of the arena and use them to shoot Admiral Blackpower. After three shots, he will come back to the fight.
This happens again at 50% life and about 25%, with more fire lines each time, which you can just dodge through. At the end of the fight, after you pick up your bag, Admiral Blackpowder has one last explosive surprise.
Final Boss: Nereid
Main Damage Type: Nature
Nereid is an interesting boss. First of all, she is Angry Earth, not Lost, so you’ll want to change your wards and coatings. She also has different Weaknesses to either regular Angry Earth or Lost – 30% Ice, 20% Strike.
Her attacks do a range of physical damage types, and she uses a Lightning spear, but the most troublesome part of this fight is the wind, which does Nature damage and pushes you around. So we recommend using some Nature protection to help out if you get stuck, and just avoiding the rest.
Nereid will fight in the centre of the arena and periodically spin along the cross pattern on the floor. It’s usually safest to stand on a diagonal, but be ready to move if she comes your way. There is a predictable pattern to her movement that you can learn. When Nereid moves to the centre of the arena and raises her staff, stand back and make sure you are on the diagonal. Gusts of wind will shoot out along the lines of the cross.
It’s possible to play this fight as ranged, from the edge of the room, as long as you keep an eye out for the tornados that circle the arena. Toward the end, there is a lot of wind and lightning (it’s very very frightening), so be careful of your positioning.
Interesting Loot
- M3 – Siren’s Set – Medium armour with Health and Elemental Aversion, upgradeable.
- M3 – Admiral’s Set – Light armour with Ice Harnessing and Elemental Aversion, upgradeable.
- M3 – Pirated weapon set for skins – split stat Con/Weapon scaling attribute, Rogue/Keen Speed/Desperate Prayer, Weapon Ability Perk.
- Waterlogged Amulet – Health, Refreshing + Random perk and attribute.
- Waterlogged Ring – Keen Awareness, Leeching + Random perk and attribute.
- Waterlogged Earring – Refreshing Toast, Fortifying Toast + Random perk and attribute.
Tempest's Heart
Enemy Type: Corrupted
Weaknesses: 30% Arcane 20% Thrust 15% Nature

Consumables
- Sapphire gem Arcane damage*
- Corrupted Ward potion – 10% damage absorption
- Corrupted Coating – 15% bonus damage
- Corrupted Combat Trophy – 3/4/5% bonus damage x3
- Thrust damage – Spear, Rapier, Bow, Musket, Blunderbuss
Note: *Elemental damage gems in your weapons are simply recommendations based on the elements your enemies are weakest to. Your playstyle may suit non-elemental gems better and you are encouraged to continue using those if so.
Artifact: Magnetic Gauntlets
Dropped by Isabella.
- +32 Magnify (selectable attribute)
- Magnetic: Crit chance increased by 50%, but crit damage reduced by up to 30%.
- Empty Socket: Attach a gem to add its effect.
- Refreshing: Reduce max cooldowns by 4%.
- Physical Aversion: Receive 4.5% less damage from ranged, physical attacks.
Strategy and tips
The Tempest is a long dungeon, so players often like to run from one gate to another and fight whatever follows, when it catches up. This can be a little overwhelming for newer players, or in higher mutations. There are lots of resources to gather, and some of the mini-boss fights are quite challenging, especially Ekheke, the spriggan. DPS should clear the 2 musket enemies while the tank moves Ekheke either on or next to the stairs, to try and reduce his movement. You’ll also meet Isabella a few times. When she has her acolytes with her, make sure you kill them to reduce her power.
Middle Boss: Neishatun
Main Damage Type: Void
Neishatun’s arena looks like it’s filled with fire but it actually does Void damage. Another of Aeternum’s snake-like bosses, Neishatun will slither away multiple times, leaving you with an arena full of fiery circles. Zoom your camera right out and look for a gap, because if you get caught in the fire when it pulses, you’ll get a Void DoT that can’t be cleansed until the fight is over. Trash mobs appear during this phase, and you can usually tell where a clear spot will be next by watching where they spawn.
Other moves to look for include a symbol above your head that means Neishatun is going to shoot at you – just move to the side to avoid it. An orb can also appear in the middle of the arena, which you need to destroy before it explodes and gives everyone a Void DoT. For those up close, be careful of the Tail Slam, Tail Swipe, Charge, and Charge Tail Whip, which all do Strike damage.
Final Boss: Isabella
Main Damage Type: Void
At the end of this expedition, you can finally fight Isabella to the death – yours or hers. The shape of this boss arena is like a triangle, with 3 clearings on the corners. The space in the middle and on the edges is filled with a murky corrupted liquid that we call the spaghetti. Do not stand in the spaghetti, it does a fast DoT and will kill you quickly.
Isabella has really grown into her wings for this fight and uses them as a weapon, as well as to swoop down on players throughout the arena. If you get a symbol above your head, it means she is going to swoop you, so be ready to duck, dive, and roll. She also sends out tendrils of corruption along the ground, that cause a slow and DoT. You can avoid them by moving toward and to the side, but it’s difficult. Corruption Tinctures can help in here. Another attack is a wide slash of corruption that moves quite slowly and can be dodged forward into.
At about 40% health, she will put up a corrupted tower on one of the clearings. If you’re killing her quickly, you can just avoid this by fighting on another clearing. If it’s taking a bit longer, you can destroy the tower by pressing E. Beware of meteors – you can see if one is about to drop by a red circle outline on the ground. If the circle overlaps where you are standing, step out of the way and then resume destroying the tower.
Once Isabella is dead, you need to go to where she lands and use your Azoth Staff to make sure she stays dead. Otherwise, the fight starts over.
Interesting Loot
- M3 – Isabella’s Set – Light armour with Enchanted Ward and Void Harnessing, upgradeable.
- M3 – Befouled weapon set for skins – split stat Con/Weapon scaling attribute, Refreshing Move, Weapon Ability Perk.
- Myrkgard’s Amulet – Health, Empowered + Random perk and attribute.
- Myrkgard’s Ring – Hearty, Crippling + Random perk and attribute.
- Myrkgard’s Earring – Refreshing Toast, Healthy Toast + Random perk and attribute.
Dynasty Shipyard
Enemy Type: Corrupted
Weaknesses: 30% Arcane 20% Thrust 15% Nature

Consumables
- Sapphire gem Arcane damage*
- Corrupted Ward potion – 10% damage absorption
- Corrupted Coating – 15% bonus damage
- Corrupted Combat Trophy – 3/4/5% bonus damage x3
- Thrust damage – Spear, Rapier, Bow, Musket, Blunderbuss
Note: *Elemental damage gems in your weapons are simply recommendations based on the elements your enemies are weakest to. Your playstyle may suit non-elemental gems better and you are encouraged to continue using those if so.
Artifact: The Butcher
Dropped by Zhou Taiying.
- +38 Magnify (selectable attribute)
- Hemorrhage: Bleeds lasts 33% longer (Works on both weapons).
- Jagged Whirls: Whirling Blade inflicts bleed, dealing 10% weapon damage for 6s.
- Empowering Whirling Blade: If 2 or more enemies are within its radius while performing a Whirling Blade attack, gain 24% base damage for each nearby target (Max 5 Targets).
- Keenly Jagged: Inflicts Bleed on critical hit, dealing 10% weapon damage per second for 6s (7s cooldown).
Strategy and tips
Be careful of the pink elemental Void attacks from maidens and mages, and either block or dodge out. A ranged weapon can be useful in here. Enemy muskets are also quite annoying, so either bring the fight to them or stand out of their line of sight so they come to you.
Middle Boss: Isabella and the Dog Fight
Main Damage Type: Slash and Void
Isabella begins this fight, leaping around and running away as usual. She has a range of physical damage types, so the tank may be best off with some Onyx and a Slash protection shield, while everyone else needs to just stay out of her reach. She will also spawn three abominations, which are pretty easy to kill.
At about 75% health, Isabella will fly toward the boats and canons will shoot from the distance. The group can huddle up next to the eastern dog cage to prevent the canon fire from landing on them, then go and resume the fight. Canon fire will continue, so make sure you’re not standing in it.
Just before she gets to half health, Isabella gets tired of fighting and opens two of the cages in the room to reveal Oro and Joven, her pet tigers. There are a few strategies for this part of the fight, including allowing the tank to hold one dog while the rest fight the other, or having a DPS play an off-tank for the second dog. This can easily go wrong, however, so you may want to have the group stand over by the west-side dog cage and get the tank to grab both of them. That way, AOE attacks will hit both enemies, killing them faster. The dogs do Slash damage and watch out for them jumping back and doing a Void breath attack, catching DPS who had been standing safely behind.
Final Boss: Empress Zhou Taiying
Main Damage Type: Void
Empress Zhou’s moves are mostly telegraphed by particle effects, so once you get to know these, you can react in time to avoid them.
- Small particles rising from the floor = Dragon Breath – only hits in front, so just dodge to the side.
- Small particles on the floor radiating out from her = Corruption Wave – dodge into the wave.
- Small particles spinning in a small and wider circle around her = Dragon Circle – if you have grit, you can stand inside, otherwise block.
- Points to a player = Dragon Dive Solo – she will shoot a dragon at you, so move!
- Multiple perpendicular pink lines – Dragon Dive – Dragons will shoot out along those lines and follow players, just step to the side and avoid them.
At about 60% health, the Empress will take a break and summon two waves of trash mobs, plus two pillars. These pillars can also perform her magic spells. Kill the mobs only, then everyone should stack at the East wall of the arena. Zhou will throw 3 more pillars and we want these at this end. Do not kill the pillars. Once all pillars are thrown, everyone should run to the West end to finish the fight.
Interesting Loot
- M3 – Empress Zhou’s Set – Light armour with Health and Refreshing, upgradeable.
- M3 – Harbinger weapon set for skins – split stat Con/Weapon scaling attribute, Enchanted/Purifying Breeze, Weapon Ability Perk.
- Shipyard’s Amulet – Health, Fortified + Random perk and attribute.
- Shipyard’s Ring – Hearty, Blood Letting + Random perk and attribute.
- Dynasty’s Earring – Refreshing Toast, Regenerating + Random perk and attribute.