Only a week to go until the Season of Opportunity in the New World: Aeternum update! Not much time left to make your plans, whether you’re heading off to fresh servers or staying with us on Delos and preparing for the Hive of Gorgons raid and the Cursed Mists PVP zone.
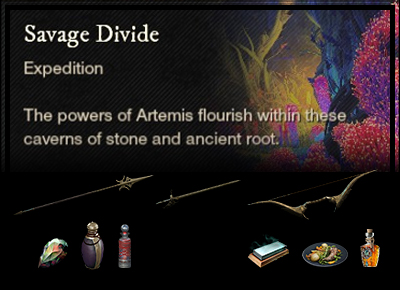
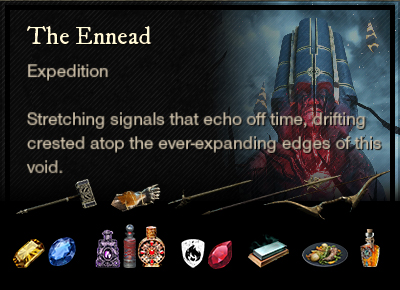
We seem to have Tarn again this week, Nature this time. The easiest option looks to be Ennead, with a synergistic Fire mutation, which it feels like we’ve had recently too. Finally, there’s Savage Divide, with Void and the eternally fun Frenzied curse.
There are three levels of Mutation, as well as Story mode, for each Expedition.
- M1 requires 650 gear score and is relatively easy, introducing the mechanics of the mutation type at a reduced level of damage.
- M2 is a little harder and requires 675 gear score, with increased scaling and the addition of the Promotion challenges. It is still quite simple to do with an experienced group and is probably the most efficient mode, with improved loot for little effort.
- M3 requires 695+ gear score and optimised perks, gems and buffs. It is considerably more challenging than M2, both with increased scaling and the addition of the mutation Curse as well as the Promotion.
Note: Elemental damage gems in your weapons are simply recommendations based on the elements your enemies are weakest to. Your playstyle may suit non-elemental gems better and you are encouraged to continue using those if so.
Expedition specific
- Opals in Armour (elemental protection)
- Beast Ward potion
- Beast Coating
- Thrust damage – Spear, Rapier, Bow, Blunderbuss, Musket
General buffs
- Honing Stone
- Attribute bonus food
- Topaz gypsum attunement potion
Mutation specific
- Void protection amulet
- Amethyst in armour
- Desert sunrise
Artifact: Endless Thirst earring
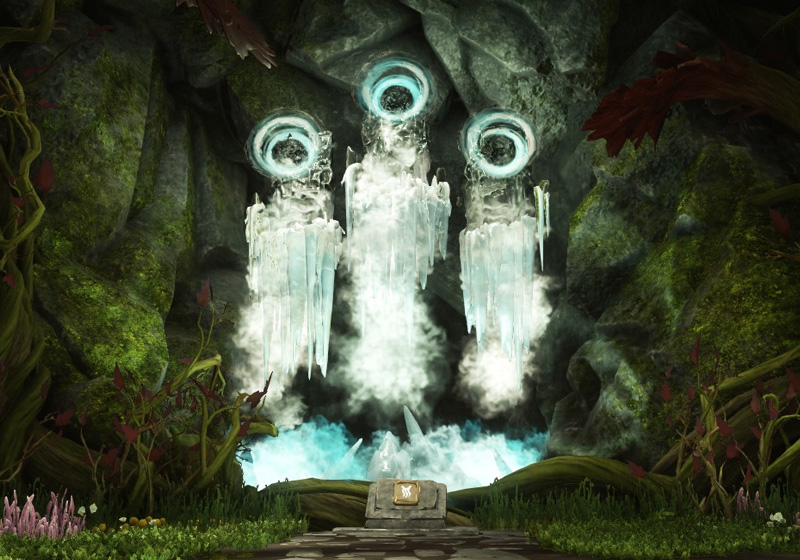
The Savage Divide is a beast-filled warren of caves, which is very easy to get confused in. Beasts have no specific elemental weakness, so feel free to use any gems your like in your weapons. Watch our for hard-hitting chameleons and annoying gorillas throwing their stuff at you. If you’re curious, you may want to see whether you can lure the mammoth Madhu down the Vast Chasm to help you find a secret.
Both boss fights focus around a range of elemental damage types, so your best bet is to keep at least some Opals in your Armour and use a Protection amulet and mutation-specific gems in your jewelry.
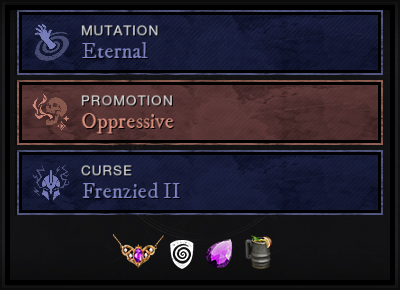
Mutation: Eternal
It’s all purple in the Divide this week, with the Eternal mutation transforming the enemies to Void damage, so go with the theme and protect yourself with Amethysts. Paranoia is particularly annoying, with stacks building up as you hit the enemy. When you reach 4 stacks, a purple pool appears at your feet, dealing 40-70% damage. This is easily dodged as an individual, but when the melee are crowded together, you can end up with some big spikes of pain. It might be an opportunity to try a ranged DPS team for a change, with the tank holding aggro and 3 bow users shooting from afar. Creeping enemies Empower their friends when they die and Oblivion enemies use a life leech that heals them when they hit you.
At M1 level, everything is a bit easier, so you will be fine with Opals rather than Amethysts, and may not need to use Ward potions or Coatings.
M2 - Oppressive
Once we reach M2, we start seeing Mage Hunters, who drain mana when hit, so healers need to make sure their mana potions are slotted. Suppressor enemies cast a silence zone in which no abilities can be used, but at least it doesn’t have the explosion at the end.
M3 - Frenzied
The real trouble starts when things get Frenzied. At M3, players begin being penalised for dodging, by acquiring a stack of Unstable that does 1.5% of max health as Void damage per second for 10 seconds and cannot be cleansed. You can get up to three of these stacks, and when you do it drops a 3m radius zone that does 10% of max health per second for 15 seconds – ouch, that’s 150% of your health if you just stand there! If you enter this zone with stacks of Unstable, it will consume them and do 30% of max HP. So, it’s really important to manage your stacks and move away from the group if you can’t avoid dropping a puddle. Don’t poop on the group.
Expedition specific
- Topaz gem Lightning damage (Ancient)
- Sapphire gem Arcane damage (Corrupted)
- Ancient and Corrupted Ward potion
- Ancient and Corrupted Coating
- Strike damage – War Hammer (Ancient)
- Thrust damage – Spear, Rapier, Bow (Corrupted)
- Flame protection and Ruby in armour (BS Ancient)
General buffs
- Honing Stone
- Attribute bonus food
- Topaz gypsum attunement potion
Mutation specific
- Flame protection amulet
- Rubies in armour
- Desert sunrise
Artifact: The Wall Tower Shield
The Ennead has more bosses than any other organisation, with three major boss fights and two bosses in the final battle. This brings us to a total of four big bosses. And don’t forget, you have to defeat the last two twice. This expedition also starts out with Ancient enemies, but with a Brimstone flavour, so if you’re getting toasted, you can consider adding some Fire protection.
The first boss you encounter is Godling Khepri Supernal, a giant scarab beetle. You need to use the architecture of the room to avoid his laser beam, by running around to the other side of the pillar once he starts casting. As long as the group works together, this is a pretty easy fight.
After getting through the twists and turns of the first maze-like section, you will use three Azoth staves to burst a Corruption bubble and encounter a series of Corrupted enemies. This culminates in the second boss fight, with General Crassus. He goes through three phases and summons a lot of adds, so it’s worth having dedicated DPS keeping them under control.
The final boss fight is a doozy. It starts with Anpu, aka Big Guy, who has some nasty elemental attacks, reaching out with ranged spikes and causing an AOE spin, as well as smacking down like a regular brute. The one attack you can control to some degree is his charge, which is usually targeted at the furthest player. If they keep a pillar between Anpu and themselves, he will bonk his head and stop his charge. Make sure you don’t stand in the trail he leaves when he charges, as it does major damage.
Once you knock Anpu over, his little buddy, Heru (aka Small Guy), turns up. He is infinitely more annoying, because he requires the whole team to work together. When he enters his levitation stage in the middle of the arena, four players need to be at each of the floating pillars and use their azoth staves, while suffering massive tick damage. It’s worth drinking a regen pot just before using your staff, to keep the ticks under control. He also stuns and creates damage zones, so be careful.
The real fun starts once Heru goes down, as at this point they both get up and the place becomes chaotic. If you don’t kill them both within 30 seconds of each other, the other one respawns, so one strategy is to get Small Guy down to almost dead, then focus on Big Guy, then when he is almost dead, take them both down. Just careful of Small Guy going into his levitation phase while you’re trying to fight Big Guy, it’s good to have a lot of DPS here to get this fight over and done with.
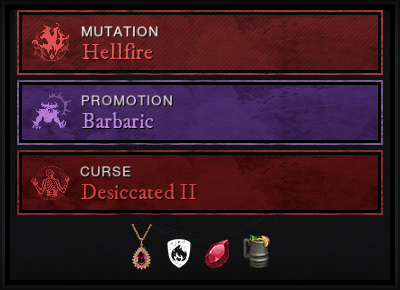
Mutation: Hellfire
Burn baby burn, this rotation it’s Fire. We start with the basic Hellfire. Look at the enemies’ nameplates to see whether they are Explosive, and be sure to position yourself well away from edges when they die, to avoid being blown over. Fiery enemies apply Burn, giving you a Fire DOT, so it’s worth drinking some Desert Sunrise before you start. Ignited enemies deal 50% of their damage as Fire, so slot Rubies in your armour and wear a Flame Protection amulet to get your Fire resistance up. Enemies with Enflamed can cast a Burn zone on the ground, so watch your positioning.
At M1 level, everything is a bit easier, so you will be fine with Opals rather than Rubies, and may not need to use Ward potions or Coatings.
M2 - Barbaric
At M2, some enemies start being Barbarically buffed. Shattering is annoying for your tank, dealing 40-75% increased stamina damage! It might even be worth stacking more of the stamina perks to keep up. Watch out for those large Enraged enemies, who deal 50% more damage once they get 20 stacks of Fury.
M3 - Dessicated
The Curse of the Burning Ennead is Desiccated, which is your basic dip and nae-nae. When a player gets a Fire ring around them, they need to dip all team members in order to remove their Shrivel. But make sure they nae-nae away before the timer ends to avoid spiking others with a chain Fire for 50% of their max health. If you’re unlucky enough to be left shrivelled, damage and healing will be reduced by 50% until the debuff wears off.
Expedition specific
- Ancient / Human Ward potion
- Ancient / Human coating
- Flame protection amulet
- Slash damage – Hatchet, Axe, Great/Sword
- Strike damage – War Hammer
General buffs
- Honing Stone
- Attribute bonus food
- Topaz gypsum attunement potion
Mutation specific
- Nature protection amulet
- Amber in armour
- Desert sunrise
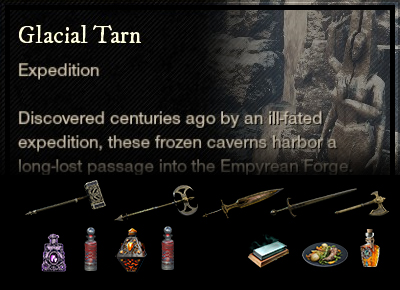
Artifact: Deep Freeze Ice Gauntlet
The Glacial Tarn is a frozen stronghold in the North-eastern corner of Great Cleave. It is connected to the Empyrean Forge and has a nice little deviation into Marius’ chamber. The first part of the expedition is Ancient, then you swap to Human, so in higher mutations you’ll be spending a bit on ward potions and coatings.
Falling stalactites will plague you from the beginning of this dungeon, so look out for the telltale marking on the floor and avoid or dodge through them. Frozen enemies take very little damage unless you have the fire buff on you, so don’t be afraid to stand on the firepits. The buff only lasts less than a minute, so sometimes you may need to go back or forge forward to refresh it.
The first boss in this dungeon is the Ice Troll and he’s a doozy! While he is classified as Ancient, he takes 15% more Thrust and Fire damage, and 20% Lightning damage, so a ranged weapon like Bow or Firestaff could be a good option. This is where you get the artifact, so some groups will stop after this fight. The Troll doesn’t like to stay with the tank and has a number of moves that see him skating around the icy arena. A blue mark above your head means he’s going to charge at you, so get out of the way. He usually does a second charge too, so beware of that. If you see an icy cone on the floor, emanating from him towards to, get ready to dodge! The cone will follow you but you can dodge out of it at the right time. During his tantrums, stalactites fall from the sky and they really hurt. You will be able to see an outline on the ground before they land so you can get out of the way. It’s okay to concentrate on staying alive during this phase and resume attacking when it’s over, if you need to.
The final boss has been buggy from the release of the dungeon, and while some of the bugs have been fixed, others remain. Try not to kill the mages while the bridges are down, in case it bugs the Giant Ice Elemental in the middle and makes our boss fail to enter the death sequence. The fight takes place on four platforms with bridges connecting them. When a red icon appears over the bridges, they are about to be destroyed, so don’t be caught standing on one. You can repair the bridges after a brief delay, by pressing E at the edge of the platform. The Giant Ice Elemental is powered by the mages and can be very annoying. When he crosses his arms, he is about to blow on a platform and make it uninhabitable. The group needs to move to another platform when this happens. If the mages are unprotected by their aura and the bridges are not down, you can kill them for a brief respite but they respawn quickly. If you get a blue symbol above your head, dodge or move to the side – an arrow or ice wave will be heading your way. If a bomb appears, destroy it quickly. When the Giant Ice Elemental has small greenish shields called weak spots up, Ser Loth gets a buff and you will do little damage to him. Nullifying Oblivion can remove the buff, or ranged attacks can destroy the weak spots.
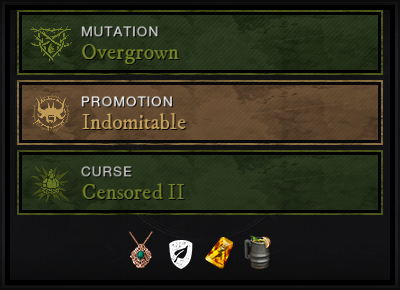
Mutation: Overgrown
Overgrown means those mobs are going to be healing one another, which really should be a privilege exclusive to us. Compost mobs drop a healing circle that works like a Sacred Ground for them and looks a bit like one too. This is one of the rare times that disease perks are useful in PVE, so pull out your Hatchet with Infected Throw, or slot a weapon with Plagued Strikes or Plagued Crits. Your Bile Bomb heartrune will also spread disease around, so vomit away to your heart’s content.
Toxic mobs spawn THE most annoyingly friendly little green blob that follows you around, does damage over time that increases at the higher mutations, and casts an area root. We just love not being able to move and getting damaged at the same time! Best bet is to try and stay out of its way. If you get stuck, it might be worth it to have Nature Absorption potions slotted and chug one down. Arboreal enemies are dealing 50% of damage as Nature, and Bramble enemies deal 20-40% base damage as Nature, so Amber slotted in your gear will protect you.
At M1 level, everything is a bit easier, so you will be fine with Opals rather than Ambers, and may not need to use Ward potions or Coatings.
M2 - Indomitable
When we get to M2, some of the mini-bosses gain Phalanx shields that block projectiles, which is particularly annoying for healers who are trying to speed up their cooldowns or charge up their heals with heavy attacks. If you play ranged DPS, make sure you have a melee weapon in your other slot and be aware that heals might be a bit less powerful. Vampiric also makes an appearance, which can make enemies slower to kill, so your Bile Bomb heartrune might be useful.
M3 - Censored
In M3, players are Censored with silence. Using abilities causes a meter to build up and when it is full, silence is cast on each member of the group where they are standing. Abilities cannot be used inside the silence zone and when it expires, it detonates with a massive 65% max health damage. So it’s pretty important to keep an eye on the meter and make sure that silence zones are strategically placed. You can deliberately set off Silence before big fights, and in boss battle arenas you can clump to stack the Silence and reduce the area impacted. While silence is active, natural mana regen is turned off, however you can get 25 mana per 0.75 seconds by standing in the silence. Just don’t be in there when it explodes!