Your guide to understanding mutations
With the mutation rotation becoming daily, it is no longer reasonable to publish an article for every rotation, so we are discontinuing our long running mutation rotation series. Instead, here is a general overview to each of the mutation types, promotions and curses, plus links to expedition guides.
Contents
Mutations
Mutations are an expanded form of our regular expeditions, with additional challenges. There are four possible mutations, based on the elements of fire, ice, nature, and void. The higher the mutation, the more obstacles and the higher the rewards.
Points are gained through completing the objectives of killing mobs and elite mobs, gathering resources, and the time taken to finish. There are penalties for dying, both individual and group wipes. You get two chances per respawn point, so if you have been down once, go back and touch the crystal to get your extra life back. Your score will determine your reward – Bronze, Silver or Gold. You need to achieve Silver or higher to unlock the next mutation level.
Rewards
| Umbral Crystals | Bronze | Silver | Gold | |
| M1 | 150 | 50 Mutator Materia | 100 Mutator Materia | 150 Mutator Materia |
| 8 Dark Matter | 16 Dark Matter | 24 Dark Matter | ||
| M2 | 200 | 100 Mutator Materia | 200 Mutator Materia | 250 Mutator Materia |
| 16 Dark Matter | 24 Dark Matter | 32 Dark Matter | ||
| M3 | 275 | 250 Mutator Materia | 500 Mutator Materia | 750 Mutator Materia |
| 4 Socket Gear | 24 Dark Matter | 32 Dark Matter | 40 Dark Matter |
The first level – M1 – only includes the base challenges from the mutation.
Hellfire

- Ignited – 50% of all enemy damage is Fire.
- Fiery – Burn is applied on hit – M1: 4% Fire damage over time, M2 & M3: 8% Fire damage over time.
- Enflamed – Enemies with this title cast a Burn zone that deals Fire damage over time. M1: 20%, M2 & M3: 40%.
- Explosive – Enemies with this title explode on death, dealing 70% Fire damage.

Consumables
- Flame Protection Amulet
- Rubies in Armor/Jewelry
- Desert Sunrise
- Fire Absorption Potion
- Honing Stone
- Attribute bonus food
Gearing up
- M1 – Opals in your armor is fine
- M2 – Add the Flame Protection Amulet
- M3 – Swap most of your Opals for Rubies
- Enchanted Ward – Aim for 4 or 5 pieces with this perk
- For more detailed advice on gear, check out our Gear Guide.
Dodge Explosions
Explosive enemies go boom! Not only does this do a big chunk of damage but it also throws you around, even off the edge of the dungeon, if you’re close. Look for the title and be ready to dodge or get out of the way.
The floor is lava
The Burn zone from Enflamed enemies can get pretty hot, so make sure you’re stacking on, and staying in, the heals. Leaving and returning to this space may cause an (unintended?) double stack of burn, so either stay with the clump or stay out of the fire.
Icebound

- Frozen – 50% of all enemy damage is Ice.
- Rime – Attacks cause a slow on hit – M1: Heavy and Special attacks, M2 & M3: All attacks.
- Glacial – Enemies with this title drop an ice crystal that slows and roots players.
- Shiver – Enemies with this title inflict Biting Cold on players who are not near them

Consumables
- Frozen Protection Amulet
- Aquamarines in Armor/Jewelry
- Desert Sunrise
- Honing Stone
- Attribute Bonus Food
Gearing up
- M1 – Opals in your armor is fine
- M2 – Add the Frozen Protection Amulet
- M3 – Swap most of your Opals for Aquamarines
- Enchanted Ward – Aim for 4 or 5 pieces with this perk
- For more detailed advice on gear, check out our Gear Guide.
Avoid Ice Crystals
Glacial enemies will drop an ice crystal on death, that can root you in place. You have a couple of seconds to move out of the crystal’s radius before it snares you, so be aware of the glacial tag and ready to move. The crystals can be destroyed, but this takes extra time. Perks like Relentless Freedom, Berserking Purge, or the 300 Dex milestone perk can help get you out of a tight spot.
Huddle up in the cold
Shiver enemies will hurt anyone outside their frosty radius, so working as a close melee group works best with these. If your group is having trouble with enemy AOE damage or the backswing on their attacks, the healer can place a Sacred Ground for ranged players to stand in.
Combat slows with speed
To make up for the slows applied by Rime, you can use speedy perks to get the group running faster. Speed of Light, the final Beacon upgrade, is one option, or the Quick Shower upgrade on Ice Gauntlet’s Ice Shower gives a short speed boost. You can also apply your own personal hastes if you are using a weapon that has them.
Overgrown

- Arboreal – 50% of all enemy damage is Nature.
- Bramble – Attacks cause damage on hit – M1: 20% Nature damage, M2 & M3: 40% Nature damage.
- Compost – Enemies with this title drop a healing circle on death, healing enemies for 3% per second.
- Toxic – Enemies with this title drop a poison spawn that deals Nature damage over time and seeks out the furthest player to cast root on them. M1: 20% Nature DoT, M2 & M3: 40% Nature DoT.

Consumables
- Nature Protection Amulet
- Ambers in Armor/Jewelry
- Desert Sunrise
- Nature Absorption Potion
- Powerful Honing Stone
- Attribute bonus food
Gearing up
- M1 – Opals in your armor is fine
- M2 – Add the Nature Protection Amulet
- M3 – Swap most of your Opals for Ambers
- Enchanted Ward – Aim for 4 or 5 pieces with this perk
- For more detailed advice on gear, check out our Gear Guide.
Get out of the Compost
If a Compost mob drops while you are still fighting, the tank should reposition to get the mobs out of the compost healing circle. You can also use the Bile Bomb Heartrune, Plagued Strikes, or other disease to reduce the effectiveness of the healing.
Don't get caught
Toxic poison spawn will chase down the furthest player, so if you’re outside the clump playing range, keep moving. You can easily outmanoeuvre the little fella but watch out if you get caught as it’ll hold you down and DoT you to death. Perks like Relentless Freedom, Berserking Purge, or the 300 Dex milestone perk can help you escape if you get stuck.
Eternal

- Abyssal – 50% of all enemy damage is Void.
- Oblivion – Attacks cause Leech on hit – M1: 20% Void DoT damage for 90% enemy heal, M2 & M3: 30% Void DoT damage for 120% enemy heal.
- Paranoia – Hitting enemies with this title applies stacks of Paranoia. At 4 stacks a Void pool appears at your feet – M1 40% Void damage, M2 & M3: 70% Void damage.
- Creeping – Enemies grant Void Empower to surrounding enemies on death, increasing Void damage by 50%.

Consumables
- Void Protection Amulet
- Amethysts in Armor/Jewelry
- Desert Sunrise
- Void Absorption Potion
- Powerful Honing Stone
- Attribute bonus food
Gearing up
- M1 – Opals in your armor is fine
- M2 – Add the Void Protection Amulet
- M3 – Swap most of your Opals for Amethyst
- Enchanted Ward – Aim for 4 or 5 pieces with this perk.
- For more detailed advice on gear, check out our Gear Guide.
Count your shots
Paranoia enemies will spike you with a Void pool for every 4 times you hit them, so count your shots and then dodge. This is one time that being in the clump can be bad for your health, if you need to stand near others – stay agile!
Kill the creepy ones last
Creeping enemies empower their friends when they die, so if you notice their title, try to keep them for last. This is particularly true if it’s a mini-boss – DPS should kill all the trash mobs while the tank holds the creepy one.
Promotions
When you get to M2 level, a promotion is added, with some additional challenges. There are four possible options that rotate through, making each rotation require some different tactics. The four types of promotion are Savage, Barbaric, Oppressive and Indomitable.
Savage

- Festering – Enemies apply a stacking Disease on being hit. M2: 2.5% reduced healing per stack, M3: 5% reduced healing per stack.
- Slicer – Enemies cast slicing beams that do 30% Void damage.
M2 - Void and Disease
We all know Slicers are annoying, even more so when you’re fully gemmed up for a different type of elemental damage. Between these and the Festering disease, your healer might need a little help keeping you alive, so make sure you bring plenty of health potions.
Barbaric

- Enraged – Each hit on an enemy generates a stack of Fury. At 20 stacks, the enemy grows 15% larger and does 50% increased damage.
- Shattering – Enemies deal additional stamina damage and apply a bleed on breaking your block. M1: 20% increased stamina damage, 5% bleed, M2 & M3: 75% increased stamina damage, 8% bleed.
M2 - The best defense is a good offense
It’s best to get in first and kill these guys fast. After being hit 20 times, Enraged enemies are going to get bigger and stronger. Your tank will also need to draw on more skills than right-click, with Shattering enemies around. A side-step can help avoid a hit without using precious stamina, if you have the footwork skills for it.
Oppressive

- Mage Hunter – Enemies drain mana on being hit. M1: 10% drain, M2 & M3: 20% drain.
- Suppressor – Enemies cast a silence zone on attacking players.
M2 - Healers gonna hate
This promotion is particularly hard on healers due to Mage Hunter. Something to note is that the mana drain only occurs if you hit the Mage Hunter mob, so if there are other targets to use for cooldowns etc, try to hit them instead. Suppressor is annoying for everyone, since the silence stops your abilities from working. At least this one doesn’t blow up.
Indomitable

- Vampiric – Enemies heal a percentage of damage done. M1: 20%, M2 & M3: 40%.
- Phalanx – Enemies cast a shield that blocks ranged attacks.
M2 - Melee and chunder
There’s a penalty for using ranged attacks once again, with Phalanx enemies putting up a deflecting shield, so make sure you have at least one melee weapon. Vampiric slows down the time to kill on mobs that have it, so slotting your Bile Bomb Heartrune can help.
Curses
Finally, at M3, a curse is added, which often makes the expedition significantly more difficult. This is offset by the best rewards being available from M3 level expeditions, including 4 socket gear.
Censored

- Blowback – Using abilities builds up to cause a zone of Silence that prevents the use of abilities. When it expires, the zone explodes, dealing 65% mutation element damage.
- Truncated – During active periods of Silence, players lose natural mana regen. Standing in the Silence zone grants 25 mana per 0.75 seconds.
M3 - Strategic Abilities
Silence is incredibly annoying for every class. Tanks can’t taunt, Healers can’t heal, DPS can’t debuff or optimise damage. The excellent thing about Blowback is that you can see the gauge and can set off the silence deliberately, before entering a big fight. If you can’t help setting it off in the middle of a fight, try to stack and then move the group.
Desiccated

- Combustible – Selects the player with the lowest percent health and surrounds them with an aura. When the aura expires, nearby players receive mutation element damage of 50% max health.
- Shrivelled – All players except the one with the aura get a Shrivelled Weaken debuff, reducing damage and healing by 50%. Stepping into the aura cleanses the debuff.
M3 - Dip and Nae Nae
Desiccated is the easiest to manage of all the curses. If you get the aura around you, be sure to dip all your teammates to remove their Shrivelled debuff. Then quickly move (or “Nae Nae”) away, so you don’t spike them with the chain mutation element damage.
Fiendish

- Weary – Periodically applies Weary to players, slowing movement by 30% and increasing incoming damage by 20%. Can be delayed by using abilities.
- Blood Offering – Using abilities applies a stack of Offering, 4.5% max health mutation element damage over time, up to a max of 3 stacks. While under the effect of Offering, the player has 25% life steal.
M3 - To Ability or not to Ability
While Weary is (apparently) delayed by using abilities, they trigger Blood Offering. As long as you are doing damage, the life leech from Blood Offering should be enough to offset the Dot (if your Con is not too high, since it’s a percentage of max health). This curse is particularly challenging when swapping protection for a boss fight, since it still applies mutation type damage. If you’re hurting too much, consider sticking to basic light and heavy attacks rather than abilities.
Frenzied

- Unstable – After dodging, players receive a stack of mutation element damage over time dealing 1.5% max health every second for 10 seconds.
- Overcharged – If Unstable expires with 3 active stacks, it drops a 3m zone that lasts 15 seconds and applies 10% max health mutation element damage per second. Entering the zone will consume all stacks of Unstable and deal 30% max HP damage.
M3 - Don't Poop on the Group
While fully geared and optimised groups can power through multiple Overcharged pools of pain, civilised dodgers might prefer to drop their load in a corner away from others. The other option is to use your dodges carefully and never allow the full three stacks to build up.
Expeditions
Each expedition has its own native elemental type that either work with or against the mutation. This may influence how you want to prioritise your protection. One important thing to note is that mutation elemental damage does not apply to boss battles, so you might want to change gear sets for boss fights.
Note: *Elemental damage gems in your weapons are simply recommendations based on the elements your enemies are weakest to. Your playstyle may suit non-elemental gems better and you are encouraged to continue using those if so.
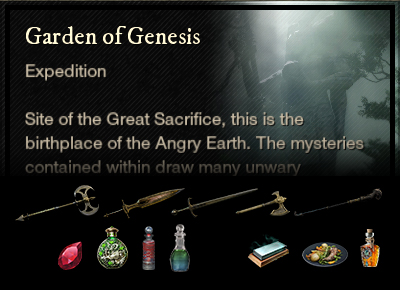
Consumables
- Angry Earth Ward potion – 10% damage absorption
- Angry Earth Coating – 15% bonus damage
- Angry Earth Combat Trophy – 3/4/5% bonus damage x3
- Slash/Fire damage – Hatchet, Axe, Great/Sword, Fire Staff
- Ruby gem in weapon for Fire damage*
Faction Missions: Caliburne in Edengrove
Artifact: Freya’s Francisca Hatchet
Enemy Type: Ancient
Weaknesses: 30% Lightning 20% Strike 15% Void
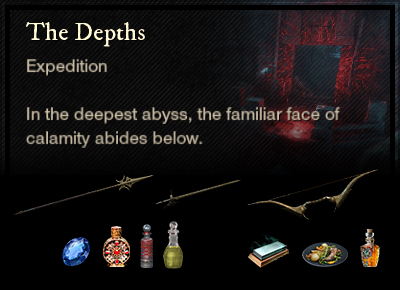
Consumables
- Ancient Ward potion – 10% damage absorption
- Ancient Coating – 15% bonus damage
- Ancients Combat Trophy – 3/4/5% bonus damage x3
- Strike damage – War Hammer, Flail
- Topaz gem in weapon for Lightning damage
Faction Missions: Farharbor in Reekwater
Artifact: Spark of Mjölnir
Enemy Type: Corrupted
Weaknesses: 30% Arcane 20% Thrust 15% Nature
Consumables
- Corrupted Ward potion – 10% damage absorption
- Corrupted Coating – 15% bonus damage
- Corrupted Combat Trophy – 3/4/5% bonus damage x3
- Thrust damage – Spear, Rapier, Bow, Musket, Blunderbuss
- Sapphire gem in weapon for Arcane damage*
Faction Missions: Moonbay in Restless Shore
Artifact: Lost Stopwatch Amulet
Enemy Type: Corrupted
Weaknesses: 30% Arcane 20% Thrust 15% Nature
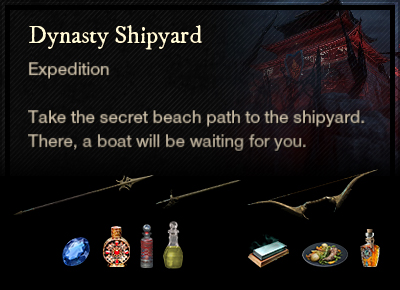
Consumables
- Corrupted Ward potion – 10% damage absorption
- Corrupted Coating – 15% bonus damage
- Corrupted Combat Trophy – 3/4/5% bonus damage x3
- Thrust damage – Spear, Rapier, Bow, Musket, Blunderbuss
- Sapphire gem in weapon for Arcane damage*
Faction Missions: Fortune’s Crossing in Ebonscale Reach
Artifact: The Butcher
Enemy Type: Corrupted
Weaknesses: 30% Arcane 20% Thrust 15% Nature

Consumables
- Corrupted Ward potion – 10% damage absorption
- Corrupted Coating – 15% bonus damage
- Corrupted Combat Trophy – 3/4/5% bonus damage x3
- Thrust damage – Spear, Rapier, Bow, Musket, Blunderbuss
- Sapphire gem in weapon for Arcane damage*
Faction Missions: Alazar’s Recall in Shattered Mountain
Artifact: Magnetic Gauntlets
Enemy Type: Ancient and Corrupted
Weaknesses: Ancient: 30% Lightning 20% Strike 15% Void. Corrupted: 30% Arcane 20% Thrust 15% Nature
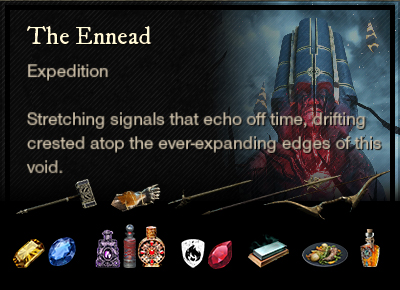
Consumables
- Ancient Ward potion | Corrupted Ward potion – 10% damage absorption
- Ancient Coating | Corrupted Coating – 15% bonus damage
- Ancients Combat Trophy | Corrupted Combat Trophy – 3/4/5% bonus damage x3
- Strike damage – Hammer, Void damage – Void Gauntlet | Thrust damage – Spear, Rapier, Bow, Musket, Blunderbuss
- Topaz gem in weapon for Lightning damage* | Sapphire gem Arcane damage*
Faction Missions: New Corsica Town, Wikala Al-Wahaha, and Taberna Mercatus in Brimstone Sands
Artifact: The Wall Tower Shield
Enemy Type: Lost
Weaknesses: 30% Nature 15% Ice 10% Strike

Consumables
- Lost Ward potion (Angry Earth Ward for Nereid) – 10% damage absorption
- Lost Coating (Angry Earth for Nereid) – 15% bonus damage
- Lost Combat Trophy (Angry Earth for Nereid) – 3/4/5% bonus damage x3
- Nature/Strike/Ice damage – Life Staff, War Hammer, Flail, Ice Gauntlet
- Amber gem in weapon for Nature damage*
Faction Missions: Spyglass Ridge in Cutlass Keys
Artifact: Void Darkplate Heavy Chestwear
Enemy Type: Ancient and Lost
Weaknesses: Ancient: 30% Lightning 20% Strike 15% Void. Lost: 30% Nature 15% Ice 10% Strike
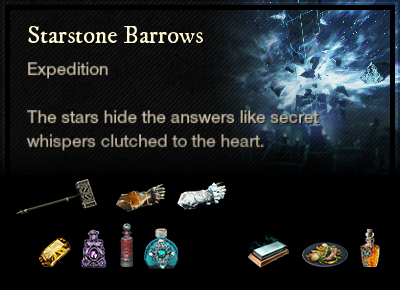
Consumables
- Ancient Ward potion | Lost Ward potion – 10% damage absorption
- Ancient Coating | Lost Coating – 15% bonus damage
- Ancients Combat Trophy | Lost Combat Trophy – 3/4/5% bonus damage x3
- Strike damage – Hammer, Void damage – Void Gauntlet | Nature/Strike/Ice damage – Life Staff, War Hammer, Flail, Ice Gauntlet
- Topaz gem in weapon for Lightning damage* | Amber gem Nature damage*
Faction Missions: Oxboro or faction base in Everfall
Artifact: Blooddrinker Ring
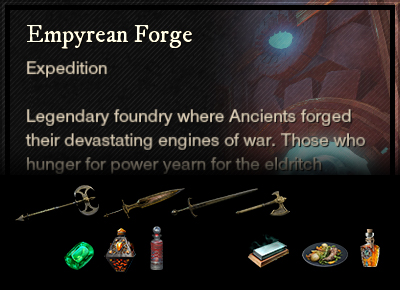
Consumables
- Human Ward potion – 10% damage absorption
- Human Coating – 15% bonus damage
- Human Combat Trophy – 3/4/5% bonus damage x3
- Slash damage – Sword, Greatsword, Hatchet, Great Axe
Faction Missions: Warden’s Rise in Great Cleave
Artifacts: Dorgort’s Blade Rapier and Inferno Fire Staff
Enemy Type: Ancient and Human
Weaknesses: Ancient: 30% Lightning, 20% Strike, 15% Void. Human: 15% Slash
Note: there are multiple unique weaknesses in this expedition, see below for more details.
Consumables
- Ancient Ward potion | Human Ward potion – 10% damage absorption
- Ancient Coating | Human Coating – 15% bonus damage
- Ancients Combat Trophy | Human Combat Trophy – 3/4/5% bonus damage x3
- Strike damage – Hammer, Void damage – Void Gauntlet | Slash damage – Sword, Greatsword, Hatchet, Great Axe
- Topaz gem in weapon for Lightning damage*
Faction Missions: Warden’s Rise in Great Cleave
Artifact: Deep Freeze
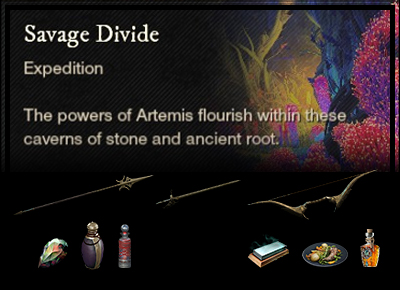
Consumables
- Beast Ward potion – 10% damage absorption
- Beast Coating – 15% bonus damage
- Wildlife Combat Trophy – 3/4/5% bonus damage x3
- Thrust damage – Spear, Rapier, Bow, Musket, Blunderbuss
Faction Missions: Last Light in Elysian Wilds
Artifact: Endless Thirst Earring